Shopping list and tools needed
WARNING: THIS IS A PAGE IN PROGRESS! DO NOT FOLLOW IT IF YOU ARE LOOKING FOR THE BUILDING OF A CAMERA FROM SCRATCH
Howdy! This is the most important section (as all the preparation steps are), please have a look at the list of parts you will need, order the correct ones with the correct options and if you are not sure just ask in the forums. Once ordered, you may wish to have a look at the tools that are required and make sure you have them at your disposal.
Parts and Tools needed

Click on the image to the right to see a larger version with the parts labelled
- IMX291 sensor board
- Lens with the lens holder - 4mm, 6mm are M16 mount as pictured, while other lenses might be CS which have a different holder
- 2x M2 screws, 6mm long - for mounting lens holder
- Camera housing
- Small cable gland (supplied with the housing)
- Large cable gland (supplied with the housing)
- Camera Power over Ethernet (PoE) cable (sometimes called a network cable by the sellers)
- Camera board holder (supplied with the housing)
- Holder metal plate (supplied with the housing)
- 4x M2 screws, 12 mm long - for mounting camera module to bracket
- 1x M3-.50 screw, 6mm long - for mounting camera module L-bracket to base plate
- Metal plate screws (supplied with the housing)
- Transparent weatherproof silicone
- Housing mounting bracket (supplied with the housing)
- Waterproof ethernet cable protector
- PoE injector to supply 48v to the camera (not shown)
- Raspberry Pi 4 Model B 2GB (or at least a 3B+ with 2GB) with official power supply (not shown)
- Raspberry Pi housing (not shown)
- 128 GB or greater microSD card (not shown)
- Self-amalgamating tape (not shown)
Purchasing Parts
For consistency across the network and to make collaborative support possible, it is recommended that the camera and lenses listed below are used in preference to random handy bits that are cobbled together. The selected components are proven and known to work well. Other components can be sourced from any convenient seller.
Many components such as the Pi and microSD cards are are readily available in most locations. For other items such as lens, camera and housing, AliExpress - the Chinese equivalent of eBay - is the preferred online source as it serves most of the globe and has been reliably suppling parts to date.
NB: Links are given to current sellers, but stock levels vary and if the link is dead or the seller is out of stock, you should be able to find an equivalent from another seller on AliExpress.
Sensor
The bare IP security camera featuring a Sony IMX291 has been selected for the RMS system. This is available from many sellers on AliExpress. Out of the options offered, choose "With 48V POE cable" and "No lens":
Always buy a lens separately from the list in the following section.
Lens
Most cameras available on Aliexpress come with a choice of lenses. The preferred lens is a 4mm f/0.95 M16 lens providing ~88x45° field of view, which can also be bought separately for example via this link.
If you live in an area with heavy light pollution, other options are available. We wholeheartedly recommend only using lenses from the following list, as others might not be as sensitive or might have large distortion. See this page for more lens options.
Housing
A security camera housing is used, providing weather-tight protection without distortion introduced by plastic domes. From the options offered, select "Plate and Bracket" to get a plate for mounting a 38x38mm bare IP camera module, and an L-shaped mounting bracket.
- IP66 CCTV Camera Housing with Plate and Bracket This will also provide a pair of cable glands and some essential screws.
Power Over Ethernet Injector
This connects by network cables to both the Raspberry Pi and the camera sensor, and injects 48V DC onto the network cable to the camera to supply it with power. Pick a suitable plug style for your location from the options offered. An example unit is:
Note that over short lengths of up to about 5m you can also use plain PoE connectors. These simply feed 12V from a power supply into the ethernet and extract it at the other end. Over short distances this will supply the camera with adequate power without the need for 48V injectors.
Finally, if you are operating several cameras, you can use a PoE switch instead of a PoE injector.
Cooled Housing for Raspberry Pi
This is one of the rare cases that fulfills our needs. It has a fan which is relatively quiet, it’s sturdy, and it can fit the RTC with the addition of riser pins. Please buy this case, we have tried many others, but they are not as good. From the options offered, make sure you select one that says "for Pi 4" if you are using a Raspberry Pi 4, or "for Pi 3B Plus" if you are using a Raspbery Pi 3B+. Additionally there is a case variation that is fully enclosed and has no fans; do not select this option.
Real Time Clock for Raspberry Pi

Very precise timing is essential to processing the meteor data, so unless you are confident in your internet connection an RTC module ensures the Raspberry Pi always has the precise time, even when power or internet is unreliable. AliExpress sells a pack of 10 but they are inexpensive - maybe share the extras among other camera constructors in your area. The AliExpress store lists two RTC modules, one labelled "DS3231 module" and the other "mini DS3231 module." Select the "mini DS3231 module" option; it is designed for the Raspberry Pi. It has 5 pins and includes a battery.
Once you plug it into the Pi (see image on the right) and make sure the current time is correct on the Pi, open the terminal and run:
sudo hwclock -w
This will set the current computer time to the RTC. Every time the Pi boots up, it will read the correct time from the RTC.
Pin Headers
Required to raise the height of the Raspberry GPIO bins to allow the RTC to sit proud of the Raspberry Pi case. You only need 1 but the pack of 20 is available for only a dollar or so.
Network cabling
You will need two lengths of network cabling, one (probably quite short) between the Raspberry Pi and the PoE injector and the other between the PoE injector and the camera. You can purchase suitable lengths locally or on AliExpress. Some people have found the following thin flat network cable to be useful for sneaking the wire through a window or door to avoid drilling holes in walls or eaves, although it will require some extra attention to seal the cable at the camera's PoE connector:
Waterproof Cable Connector
One end of the network cable will be outside, connected into the PoE cable from the camera. This is not only carrying data but 48V DC power and needs to be kept sealed. This waterproof connector is fitted over the end of the network cable connector then after the network cable is plugged into the camera's PoE cable, the connector is locked into the end of the PoE cable. For extra weatherproofing, wrap in self-amalgamating tape.
128GB Micro SD Card or 256GB USB flash disk
You may choose between an SD card and a USB flash disk, no need to have both.
You need at least a 64GB card but a 128GB is recommended as 20+ GB of data is collected every night. Make sure it is a fast card eg Class 10 UHS-1 or better. A card can either be purchased locally or from AliExpress. Be warned that there is an ongoing problem with the production and sale of fraudulent memory cards misreporting the available storage and even supplies from a reputable outlet can be affected - test the card you purchase. The AliExpress link has been used successfully to obtain suitable micro SD cards. If you live in North America, buy your SD cards at Costco.
If you want to go for a USB flash disk, this one is verified to work well Kingston DataTraveler Kyson 256 GB. We recommend you source it locally, for the reference the link to get it on amazon.com
Raspberry Pi 4
These are likely to be available to be purchased locally or from a domestic online source. You need at least a 2GB RAM model. The Raspberry Pi Model 4B is now the minimum spec. Previously, a Raspberry Pi Model 3B+ was considered the minimum but these do not have the performance or memory to handle busy meteor showers. Purchase the official 5.1V 3A 15.3W power supply to go with it - most problems with Raspberry Pi units are due to inadequate power supplies being used instead of purchasing the official power pack. Note: to connect a RPi 4B to a monitor you will also need a micro-HDMI cable, so that might be necessary to add to the shopping cart also.
Additional items and tools
- Source suitable M2 and M3 screws. It might be possible to find these locally but in some places they are just odd enough to be quite hard to find. You could order some hardware from the ScrewHome Store on AliExpress. Each packet of 50 M2x6mm, M2x12mm, and M3x6mm machine screws will cost only a few dollars.
- A tube of silicone sealant is used to seal the glass window for the housing and the front screws in the housing.
- Self-amalgamating tape can be used to wrap and seal the cable connector(s) to ensure they remain weathertight in all conditions.
- Tools such as small wire cutters or a sharp knife, various sized screwdrivers, a drill and screws to mount the camera bracket will be required.
- RJ45 crimper tool to finish the ethernet cable will be needed.
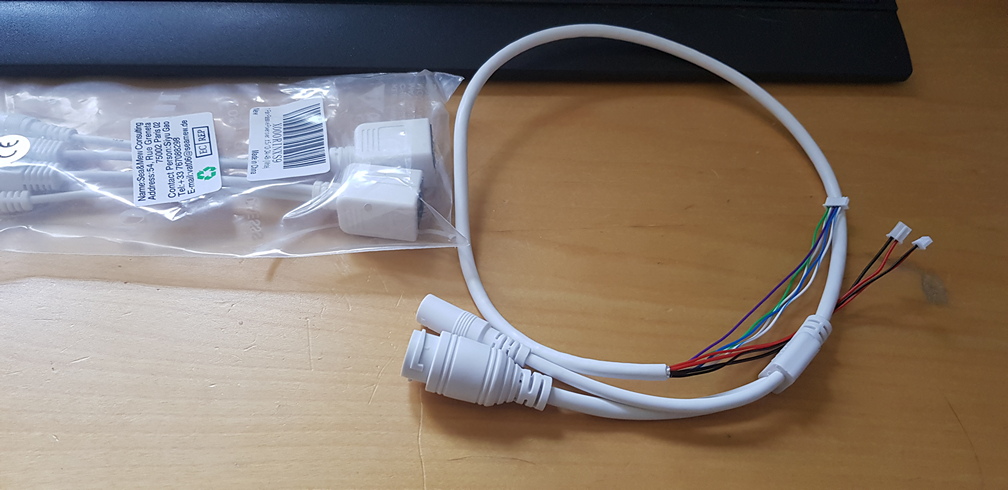
Some cameras come with a slightly different cable with a separate 12V socket for power input as shown here. If the power input port has a small cap, then you can just cover it and use the PoE on the ethernet port. If it's open, then you will need a pair of PoE adapters (seen in that picture in the background).
To test and focus the camera you will need VLC. This software is preinstalled on the Pi but is also available for Mac, Windows or Linux from here.
You are now done with this section or you are waiting for the parts. Anyway, you may proceed to have a look at the build of the camera itself or to start actually building it. Have fun! Back to the signpost page.