Shopping list and tools needed
Ordering the correct components is the most important aspect of your camera build. Review the entire list and make sure you order the correct options. If you are not sure, posta question in the forums. You also should review the list of tools to identify what may be missing.
Parts and tools

Click the image to the right to see a larger version of the parts and tools.
- IMX291 sensor board (IMX307 sensor board if IMX291 sensor board is sold out)
- Lens with the lens holder - 4mm, 6mm are M16 mount as pictured, while other lenses might be CS which have a different holder
- 2x M2 screws, 6mm long - for mounting lens holder
- Camera housing
- Small cable gland (supplied with the housing)
- Large cable gland (supplied with the housing)
- Camera Power over Ethernet (PoE) cable (sometimes called a network cable by the sellers)
- Camera board holder (supplied with the housing)
- Holder metal plate (supplied with the housing)
- 4x M2 screws, 12 mm long for mounting camera module to bracket
- 1x M3-.50 screw, 6mm long for mounting camera module L-bracket to base plate
- Metal plate screws (supplied with the housing)
- Transparent weatherproof silicone
- Housing mounting bracket (supplied with the housing)
- Waterproof ethernet cable protector
- PoE injector to supply 48v to the camera (not shown)
- Raspberry Pi 5 (recommended) or Raspberry Pi 4 Model B 2GB (minimum) with official power supply (not shown)
- Raspberry Pi housing (not shown)
- 128 GB or greater microSD card (not shown)
- Self-amalgamating tape (not shown)
Purchasing parts
For consistency across the network and to facilitate collaborative support, it is best to use only the camera and lens listed below, instead of assembling alternatives only because they are conveniently available. The selected camera and lenses are proven and known to work well. Feel free to source other components from any convenient seller.
Many components, such as the Pi and microSD cards, are are available from many vendors. However, AliExpress (the Chinese equivalent of eBay) is the preferred online source for a lens, camera, and housing. AliExpress serves most of the globe and has been reliably suppling parts for a long time.
- NOTE: Links are to current sellers but inventory levels can vary. If a link is dead or the seller is out of stock, you should be able to find an equivalent from other sellers on AliExpress.
Sensor
The bare IP security camera selected for the RMS system features a Sony IMX291, available from many sellers on AliExpress. Of the options offered, choose With 48V POE cable and No lens.
If the IMX-291 camera is sold out from that vendor and you cannot find another IMX-291 vendor, you may be able to locate a suitable IMX-307 sensor.
- NOTE: Many vendors sell IMX-307 sensor boards that are not suited for nighttime meteor recording. It is important to buy the correct IMX-307 because only a specific hardware version combined with a specific firmware version work correctly to record meteors.
One RMS/GMN tester offered these thoughts:
- The only IMX-307 worth trying is the Hangzhou Jiefeng Technology GK7205V210, aka IVG-G3S, which is distinguishable by a white square on the board. I do not recommend a blanket ‘get-any-IMX-307’ statement for new cameras because sensor boards can be very different from each other.
- The only acceptable IMX-307 sensor boards I've found includes the firmware version:
- V5.00.R02.000739AG.10010.140400.0020000.
- A firmware version with a similar number is NOT acceptable:
- V5.00.R02.000739AG.10010.140400.0020010.
- Here is a link to Hangzhou Jiefeng Technology: Hangzhou Jiefeng Technology.
- When you place an order, it is best to specify the characteristics of the IMX-307. For example, your request could be something like this:
- GK7205V210 (IVG-G3S), with white square on circuit board, and firmware version V5.00.R02.000739AG.10010.140400.0020000.
- IMPORTANT: These recommendations are likely to change over time, so you should check our parts list and vendor recommendations before you place an order.
Lens
- IMPORTANT: Buy a lens separately and select only from these options.
Most cameras available on AliExpress are sold with a choice of lenses. The preferred lens is a 4mm f/0.95 M16 lens, which provides a ~88x45° field of view (FOV). The lens also is available separately at this link.
Alternative lenses (4mm and 6 mm) are available here:
If you live in an area with heavy light pollution, other options are available. We recommend using only lenses from the following list. Other options may not be as sensitive or may have significant distortions. See this page for more lens options.
Housing
A security camera housing provides weather-tight protection without the distortion of a plastic dome. From the options offered, select Plate and Bracket. The plate holds a 38x38mm bare IP camera module on an L-shaped mounting bracket.
This combination also provides a pair of cable glands and some essential screws.
Power over Ethernet (PoE) injector, PoE switch (optional), and PoE replacement camera side cables (optional, but recommended)
This combination uses network cables to connect the Raspberry Pi and the camera sensor, and injects 48V DC into the network cable to power the camera. From the list, select a plug style that is appropriate for your location.
This is an example of plug styles available.
- NOTE: Over short cable lengths (up to about 5m), you also can use plain PoE connectors. These connectors feed 12V from a power supply into the ethernet and extract it at the other end. Over short distances, this configuration can supply the camera with adequate power without the need for 48V injectors.
If you operate several cameras, you can use a PoE switch instead of a PoE injector, and connect all the cameras to your network.
- NOTE: You must source a PoE switch locally.
- TEF1110P-8-63W 10-Port 10/100M Desktop Switch with 8-Port PoE
- GOOD PRACTICE: Maintain one or more spare PoE camera side cables.
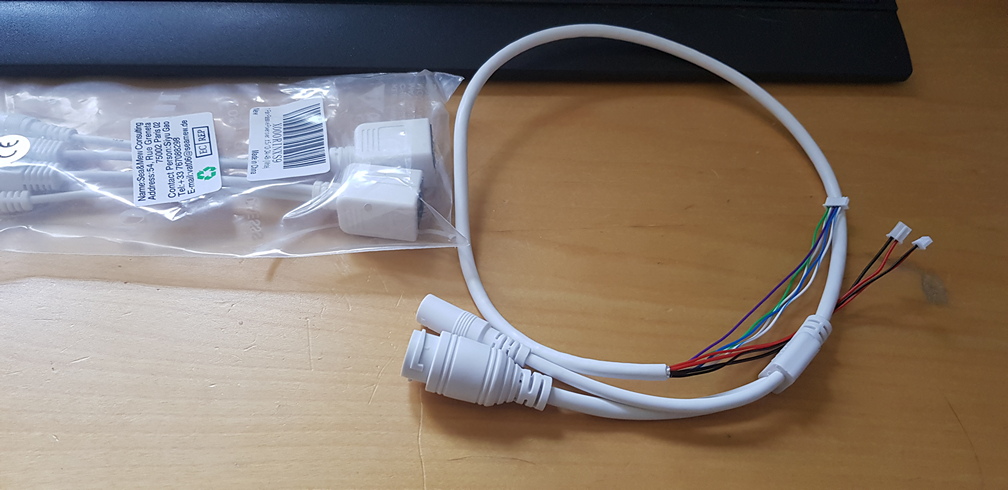
- Poe cable - Select RJ45 or RJ45DC
Alternative cable
The picture shows only two connectors, but you will receive all connectors needed for the IMX291 board:
- 1 pcs 2pin port (2.0mm)
- 1 pcs 4pin port (1.25mm)
- 1 pcs 6pin port (1.25mm)
- 1 pcs 8pin port (1.25mm))
Cooled housing for Raspberry Pi
Please buy one of the two cases below. We have tried many others, but they are not as good.
- Fan-cooled case. It has relatively quiet fans, and it's sturdy. From the options offered, ensure you select one that says "for Pi 4" if you are using a Raspberry Pi 4, or "for Pi 5" if you are using a Raspberry Pi 5. IMPORTANT: There is a case variation that is fully enclosed and has no fans; do not select this option.
- Passively cooled case. It is silent, with no fan to replace in future. Many operators have found this one satisfactory if the Pi is operated in moderate room temperatures with ample air circulation around the Pi. Some operators report diminished WiFi strength with passive fanless cases because metal heat sinks may interfere with the small antenna.
If the Pi is in a hot environment, then choose the case with the fan. If silent operation is the priority, then go fanless but pay attention to the free circulation of air around the Pi. Case fans often use cheap sleeve bearings. If they get noisy or stop spinning later, try replacing them with a fan that uses ball bearings. Thermostatically controlled fans like the 'Pimaroni Fanshim' can also be a good solution.
For the Raspberry Pi 5, the OEM fan assembly should be purchased. It has a heat sink with fan speed controlled by the operating system responding to CPU temperature.
Real time clock (RTC) for Raspberry Pi4

Precise timing is essential for processing meteor data, and an RTC module assures that Raspberry Pi always has the precise time, even when power or internet is unreliable. AliExpress sells a pack of 10 but they are inexpensive, so you may want to share extras among other camera constructors in your area.
The AliExpress store lists two RTC modules - one labelled DS3231 module and another labelled mini DS3231 module. Select the mini DS3231 module option, which is designed for the Raspberry Pi. (It has 5 pins and includes a battery.)
After you plug the RTC into the Pi (see image on the right), verify that the current time is correct on the Pi, then open the terminal and run:
sudo hwclock -w
This command sets the current computer time to the RTC. When the Pi boots up, it reads the correct time from the RTC.
The Pi5 contains a built-in RTC. In most cases, the optional external battery is not needed for the Pi5's RTC.
Pin header
This pin raises the height of the Raspberry GPIO bins so the RTC sits proud of the Raspberry Pi case. You need only 1, but the pack of 20 costs only about a dollar.
Network cabling
You need two lengths of network cabling, one (quite short) between the Raspberry Pi and the PoE injector, and the other between the PoE injector and the camera. You should be able to easily find both of these locally, but you also can order them from AliExpress.
Some people have found that a thin, flat network cable (shown in the figure) is useful to avoid drilling holes in walls or eaves when you want to snake a wire through a window or door. Regardless of you choice, additional sealant or insulation is required to seal the cable at the PoE connector of the camera.
Waterproof cable connector
One end of the network cable is outdoors, connected to the PoE cable from the camera, so it must be sealed. (This connection carries data as well as 48V DC power.)
Place the waterproof connector over the end of the network cable connector, plug the network cable into the PoE cable on the camera, then lock the connector onto the end of the PoE cable.
- GOOD PRACTICE: For extra weatherproofing, wrap the connector in self-amalgamating tape.
- RJ45 Waterproof Connector Cap
128GB micro SD card or 256GB USB flash drive
You can use either an SD card and a USB flash drive, but there is no need to have both. You must have at least 64GB of storage, but 128GB is recommended because 20GB of data - or more - is collected every night. The card should be fast - Class 10 UHS-1 or better. As with the cables, you can purchase a card locally or from AliExpress.
- WARNING: There is an ongoing problem with the production and sale of fraudulent memory cards that misrepresent the available storage. Even supplies from a reputable outlet can be affected, so you should test any card you purchase. The AliExpress link has been used successfully to obtain suitable micro SD cards. If you live in North America, Costco is a reliable local source.
If you prefer to use a USB flash drive, the Kingston DataTraveler Kyson 256 GB has been verified to work well. We recommend you source it locally or on amazon.com.
Raspberry Pi 4 or 5
You should be able to purchase these purchased locally as well as from a domestic online source. You must have at least a 2GB RAM model, and the Raspberry Pi Model 4B is now the minimum spec. As RMS adds functionality, the 4GB or higher RAM version is suggested. Previously, a Raspberry Pi Model 3B+ was considered the minimum spec, but Pi3 does not have the performance or memory to handle busy meteor showers.
- NOTE: The Pi3 runs on Python 2. We are now past the July 1, 2025, cut-off point and we no longer support this version.
- IMPORTANT: Purchase only the official 5.1V 3A 15.3W power supply for a Pi4. The Pi5 requires 5V, 5A power supply due to its increased power consumption. Most problems with Raspberry Pi units can be traced to inadequate power supplies. Please use the correct power supply for the Pi version you choose to deploy.
Additional items and tools
- Micro-HDMI cable: Connect a RPi 4B to a monitor.
- M2 and M3 screw: You may find these locally but, in some places, they may be quite difficult to locate. You may want to order hardware from the ScrewHome Store on AliExpress. Each packet of 50 M2x6mm, M2x12mm, and M3x6mm machine screws costs only a few dollars.
- Silicone sealant: Seal the glass window and front screws in the housing.
- Self-amalgamating tape: Wrap and seal the cable connectors so they are weathertight.
- Tools:
- * Small wire cutters or a sharp knife
- * Assorted screwdrivers
- * Drill
- * RJ45 crimper to attach connectorsto the ends of the ethernet cable.
- * Some cameras come with a slightly different cable with a separate 12V socket for power input, as shown here. If the power input port has a small cap, you can cover it and use the PoE on the ethernet port. If it is open, you need a pair of PoE adapters (seen in that picture in the background).
- * VLC software: To test and focus the camera, you must have this software. It is preinstalled on the Pi, but it also is available for Mac, Windows, or Linux from VideoLan.
At this point, you have completed this section or you are waiting for parts. It is a good time to review the instructions for building the camera or to actually begin the process. Either way - have fun!