Ahoj! In this section, cable the camera for the first time, do the preliminary focusing, configure your camera and optionally test the whole system.
Testing and Focusing
At this point, your camera must be tested and focused. There's no point sealing up the housing and screwing it to the wall if its not working or isn't focused !
Testing the Camera
- If your camera came with a single PoE cable, connect this to a netork cable and plug the other end of the network cable into your PoE injector.
- if your camera came with a cable with separate network and power sockets, plug the "output" PoE adapter into the camera cable and plug a network cable into the PoE adapter, then connect the other end of the network cable into the other PoE adapter.
- . Connect the PoE adapter or injector into a spare socket on your home router and connect the camera power supply to it.
The Camera PoE cable lights should come on, indicating traffic is flowing. After a few seconds, it should steady down to irregular flashing. If you don't see flashing lights then check the cable connections to make sure everything is plugged in properly.
Find its IP Address
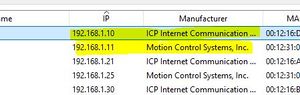 Finding the Camera Address The camera should now appear as a device on your network and to test it properly you will need to find its IP Address. The easiest way to do this is using a free piece of software called [IP Scanner]. Download and run it (no need to install). Click "Scan" and wait till it finishes. The camera can usually be identified by Manufacturer 'ICP Internet Communications' or 'Motion Control Systems', though other vendor names are possible such as 'Koenig & Bauer AG' and 'Metrohm AG'. If none of the names look right you may need to experiment by trying to connect to each candidate in turn.
Checking the Connection
- Once you have the IP Address, open VLC on your Pi, Mac or Windows machine, and from the "Media" menu, select "Open Network Stream".
- Enter the following into the address box, replacing 1.2.3.4 with the address you got in the previous step
rtsp://1.2.3.4:554/user=admin&password=&channel=1&stream=0.sdp
- After a second or two, you should get a view through the camera. If nothing comes up, check you have got the right IP address, and that the cables are secure.
- You can now double-check that you installed the camera the right way up.
If the image is upside down in VLC, turn it through 180 degrees in the housing. do not be tempted to use firmware settings to flip or mirror the image. These cameras have a 'rolling' shutter and to work out precise timings of meteors, the RMS software compensates for the shutter movement. If the camera is upside down and the image then flipped, the shutter is working in the opposite direction to that expected by RMS and timings will be wrong. You must physically rotate the camera.
- Note that its entirely normal for the image to be very red and overexposed in daylight. We've removed the IR Block filter so the camera picks up a lot of red light. This is exactly what we want.
|
Checking for Obstructions of camera housing
This is to make sure that the camera housing is not too visible in the camera's FoV.
- Temporarily close the housing case up and check if it can be seen obstructing the view anywhere.
- Check the live stream from the camera and if necessary bend or tilt the bracket to angle the camera down a bit (inside the camera housing).
- However, don't worry if you can't eliminate all obstructions. Later on you will create a software mask to prevent these areas causing false detections.
|
Focusing the Camera
There's a whole separate section of the Wiki on focusing, but here's the short version !!
- With the camera in the housing, connect the camera to your network as above.
- Open VLC.
- At night, aim the camera out an open window at something at around 30-50 metres away.
- Screw the lens in and out slowly to get best focus.
- Pin-sharp focus is not necessary and is in fact not optimal - a little out of focus is fine as it helps stars show up.
Aside: it is not necessary to focus on stars as the camera has an enormous depth of field and anything from a few metres to infinity will be in focus. However, you can double-check focus on stars if you want.
You can use the RMS utility ShowLivestream instead of VLC, if you have already fully configured the camera and Pi as explained in the next step.
Note that there's a short lag due to the network, so you should wait a second or two after each adjustment to allow the change to be reflected in VLC.
Important note: if your camera came with an electronic filter and you have left the 'daytime' filter in place you MUST finalise focus at night. The filters slightly alter focus.
[Optional] All system test
- Hook RPi up to a monitor with an HDMI cable
- Plug a keyboard and mouse into USB ports on the RPi
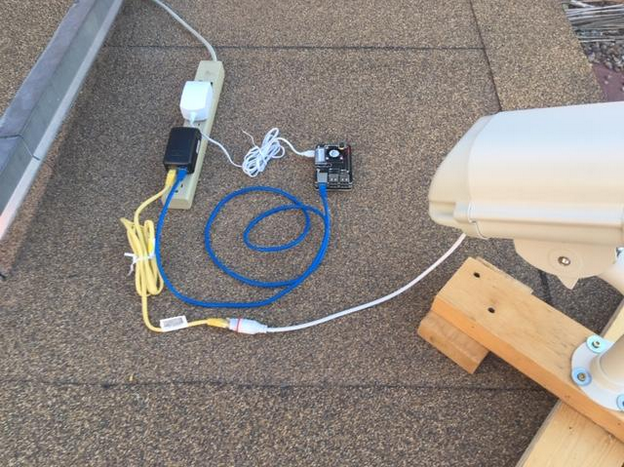
- Connect one end of an ethernet cable into the ethernet port on the RPi and the other end into the ‘LAN’ port on the POE injector (See image below).
- Connect another ethernet cable into the ‘POE’ port on the injector and run to the camera cable connector (See image below). Before plugging into the camera, run the cable end through the ethernet connector cover.
- Plug the POE injector into a wall outlet.
- Plug the RPi power supply into the RPi and then into a wall outlet.
- The first thing you would need to do is to connect it to WiFi. In the upper right corner, click on the two arrows pointing up and down, choose your WiFi network and enter the password. You should now be connected to the Internet.
- Ignore (for now) the steps in the terminal window shown on the screen which will help you set everything up.
- The video stream can be checked by double-clicking on the RMS.ShowLiveStream icon on the desktop. When asked, click ‘Execute in terminal’. You should then see a live stream from the camera. To stop the live stream hold down the ‘Ctrl’ key and press ‘c’ while the mouse is in the terminal window that popped up. Note that the stream will lag behind the real-view for a few seconds.
If the video stream opens and looks good, then you have successfully tested your system!
Camera setup & configuration
To operate at night, the camera must be reset to the correct gain, colour mode and video mode. There are two ways you can do this - doing it via the CMS software (works on Windows only) or via RMS scripts (can be done directly from your Raspberry Pi). In any case it is recommended to watch the below video.
Please note: IMX307 has almost identical firmware and the settings are the same apart from one and that is gain, which you need to set to 15 instead of 60 as for IMX291.
Warning: Please set IMX307 to a fixed IP address instead of DHCP as there were reported issues with the DHCP setting on this module.
Camera setup & configuration - Youtube video method
- CMS is a security camera software package you can download as a rar archive here or as a zip archive here. You can use the software as explained in the video by Denis Vida below.
- Note however that you should reset the network as the LAST thing you do. The video does it a bit soon.
|
|
|
Camera setup & configuration - RMS Script method
 Making sure the Pi can see the Camera Note that all RMS scripts MUST be run from the source/RMS folder as the Pi user. Don't be tempted to cd into a different folder! It won't work.
- If you have a Pi4, you can use a utility that's part of RMS, as follows:
- If you're not using the pre-built image, first install RMS on the Pi as explained here.
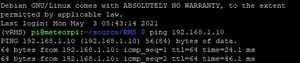
- Now plug the camera into your router, open a Terminal window on the Pi and, using the address of your camera, make sure the Pi can ping the camera:
ping a.b.c.d
If you get any errors or timeouts, check the camera IP address, and check that the Pi is connected to your home network.
- Next open a terminal window and run this script to reset the camera IP address.
python -m Utils.SetCameraAddress a.b.c.d 192.168.42.10
- You will lose connection to the camera and see a bunch of error messages. Thats normal. Once you see a timeout message, unplug the power and network from the camera.
- Now plug the camera directly into the Pi's ethernet port, open a Terminal window and run the following script to update the camera gain, video mode, and other settings.
Scripts/RMS_SetCameraParams.sh
Run this ONLY FOR IMX307 as addition to the script run above
python -m Utils.CameraControl SetParam Camera GainParam Gain 15
- Note: If you have RMS installed on your PC then you can change the camera address from your PC instead, then connect it to the Pi and run the 2nd script.
|
You are now done with this section and now you are going to install your camera into the position. Drilling holes into the wall is fun, right? Back to the signpost page.
|


