Optional steps: Difference between revisions
RadimStano (talk | contribs) No edit summary |
RadimStano (talk | contribs) No edit summary |
||
| (2 intermediate revisions by the same user not shown) | |||
| Line 1: | Line 1: | ||
Ahoj! In this section, you will be introduced to some more, but optional steps. | Ahoj! In this section, you will be introduced to some more, but optional steps. | ||
| Line 22: | Line 21: | ||
6) That’s it, the VPN should be working on your Pi! To check the VPN IP address, hover your mouse cursor on the VNC icon (upper right), and it will show you an IP address which looks something like this: 10.8.X.X. If you are also connected to the VPN, you may use this IP address to connect to your camera. If you want to connect to the VPN with your PC, please contact Denis or the GMN group for more details. If you are on Windows, the domain name like ca0001.gmnnet (replace ca0001 with your station code, lowercase) should work too. | 6) That’s it, the VPN should be working on your Pi! To check the VPN IP address, hover your mouse cursor on the VNC icon (upper right), and it will show you an IP address which looks something like this: 10.8.X.X. If you are also connected to the VPN, you may use this IP address to connect to your camera. If you want to connect to the VPN with your PC, please contact Denis or the GMN group for more details. If you are on Windows, the domain name like ca0001.gmnnet (replace ca0001 with your station code, lowercase) should work too. | ||
== | == GMN weblog upload (upload to the GMN website - replacement for Istrastream) == | ||
=== [ | === [https://globalmeteornetwork.org/weblog/ GMN weblog archive] === | ||
: The | : The GMN weblog is a replacement for Istrastream archives and it is recommended that you enable it, although it is not necessary for camera operations. This page adds the possibility to check your daily upload comfortably via the webpage instead of checking it directly on your camera's Raspberry Pi. You may check it in the link above to decide. The website is publicly available. | ||
To enable the | To enable this feature, simply add this to your config file or if it is already there, just enable it. You can add the description of your camera too. | ||
[[File:weblog_screenshot.png|1024px|]] | |||
'''How to modify your config file''' | |||
Boot up your RPi. On the desktop there is a file called “RMS config”, open it. | |||
This is how the config file should look, you can add it right after your camera parameters (section [System]) : | |||
<pre> | <pre> | ||
; Show this camera on the GMN weblog | |||
weblog_enable: true | |||
; The description that will be shown on the weblog (e.g. location, pointing direction) | |||
weblog_description: none | |||
</pre> | </pre> | ||
Example of the config with position of the weblog: | |||
[[File:weblog_config.png]] | |||
Finally, this document explains what every plot on the IstraStream weblog means: | Finally, this document explains what every plot on the GMN weblog/IstraStream weblog means: | ||
=== [https://docs.google.com/document/d/132aHGn0QPzhpVN2s2n6FT6rJn39LAsPkchWJqXQb8Qk/edit?usp=sharing IstraStream Plots Explanation] === | === [https://docs.google.com/document/d/132aHGn0QPzhpVN2s2n6FT6rJn39LAsPkchWJqXQb8Qk/edit?usp=sharing GMN weblog/IstraStream Plots Explanation] === | ||
You are now done with this section and you may introduce yourself and your fancy new camera to the friendly community. [https://globalmeteornetwork.org/wiki/index.php?title=Build_%26_Install_%26_Setup_your_camera_-_The_complete_how-to Back to the signpost page.] | You are now done with this section and you may introduce yourself and your fancy new camera to the friendly community. [https://globalmeteornetwork.org/wiki/index.php?title=Build_%26_Install_%26_Setup_your_camera_-_The_complete_how-to Back to the signpost page.] | ||
Latest revision as of 08:08, 18 October 2023
Ahoj! In this section, you will be introduced to some more, but optional steps.
Connecting the camera to VPN (optional)
IMPORTANT NOTE: You should only complete this step if you were instructed to do so.
1) Open the terminal
2) Navigate to Desktop (there should be a DownloadOpenVPNconfig.sh script there):
cd ~/Desktop
3) Run the DownloadOpenVPNconfig.sh script and give it your station code as the argument. In this example I’m using CA0001 - make sure to use your station code.
./DownloadOpenVPNconfig.sh CA0001
4) If everything goes well, you will see the message: Initialization Sequence Completed. Press CTRL + C to exit the script.
5) Reboot your Pi.
6) That’s it, the VPN should be working on your Pi! To check the VPN IP address, hover your mouse cursor on the VNC icon (upper right), and it will show you an IP address which looks something like this: 10.8.X.X. If you are also connected to the VPN, you may use this IP address to connect to your camera. If you want to connect to the VPN with your PC, please contact Denis or the GMN group for more details. If you are on Windows, the domain name like ca0001.gmnnet (replace ca0001 with your station code, lowercase) should work too.
GMN weblog upload (upload to the GMN website - replacement for Istrastream)
GMN weblog archive
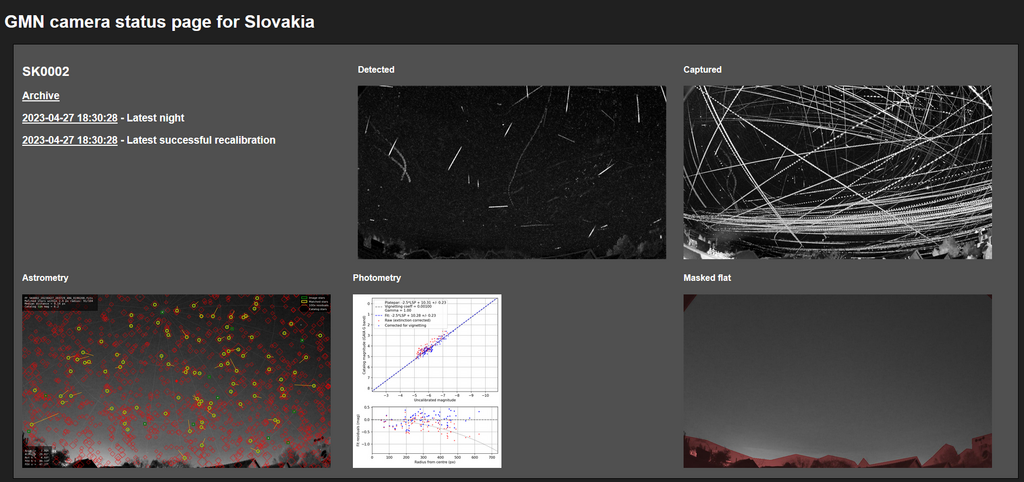
- The GMN weblog is a replacement for Istrastream archives and it is recommended that you enable it, although it is not necessary for camera operations. This page adds the possibility to check your daily upload comfortably via the webpage instead of checking it directly on your camera's Raspberry Pi. You may check it in the link above to decide. The website is publicly available.
To enable this feature, simply add this to your config file or if it is already there, just enable it. You can add the description of your camera too.
How to modify your config file
Boot up your RPi. On the desktop there is a file called “RMS config”, open it.
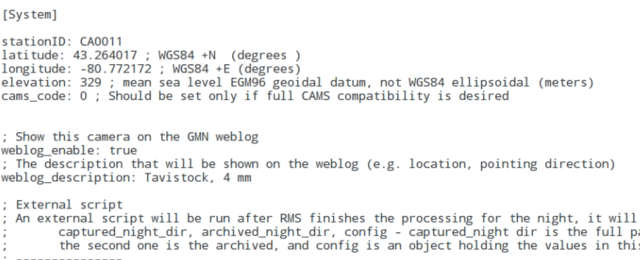
This is how the config file should look, you can add it right after your camera parameters (section [System]) :
; Show this camera on the GMN weblog
weblog_enable: true
; The description that will be shown on the weblog (e.g. location, pointing direction)
weblog_description: none
Example of the config with position of the weblog:
Finally, this document explains what every plot on the GMN weblog/IstraStream weblog means:
GMN weblog/IstraStream Plots Explanation
You are now done with this section and you may introduce yourself and your fancy new camera to the friendly community. Back to the signpost page.

