Build A Camera: Difference between revisions
Markmcintyre (talk | contribs) No edit summary |
Markmcintyre (talk | contribs) No edit summary |
||
| Line 3: | Line 3: | ||
= Parts and Tools needed = | = Parts and Tools needed = | ||
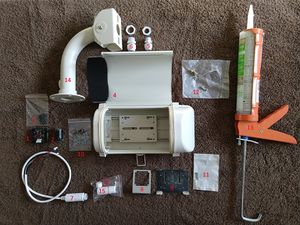
[[File:01_annotated.jpg|thumb|right|Annotated Parts List]] | [[File:01_annotated.jpg|thumb|right|Annotated Parts List]] | ||
Click on the image to the right to see a larger version with the parts labelled | |||
# IMX291 sensor board | # IMX291 sensor board | ||
# Lens with the lens holder - 4mm, 6mm are M16 mount as pictured, while other lenses might be CS which have a different holder | # Lens with the lens holder - 4mm, 6mm are M16 mount as pictured, while other lenses might be CS which have a different holder | ||
| Line 24: | Line 27: | ||
= Assembly = | = Assembly = | ||
[[File:Irblock. | == Preparing the lens == | ||
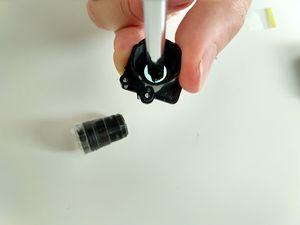
[[File:Irblock.jpg|thumb|right|Punching out the filter]] | |||
Start by removing protective covers from the sensor and lens. Take care not to touch the sensor after this! | Start by removing protective covers from the sensor and lens. Take care not to touch the sensor after this! | ||
The cameras come with an IR Block filter in the lens holder. We don't want this, so unscrew the lens from the holder and | The cameras come with an IR Block filter in the lens holder. We don't want this, so unscrew the lens from the holder and using a screwdriver, carefully punch out the filter as shown in the image on the right. Make sure there are no shards left. | ||
On the underside of the lens holder you'll see two plastic nubbins. These get in the way, so using the wire cutters. snip them off, then screw the lens back into the lens holder. | |||
== Attaching the lens == | |||
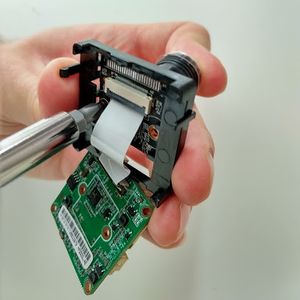
[[File:lensattaching.jpg|thumb|right|Attaching the Lens]] | |||
Carefully unclip the circuit board from the plastic holder, but DO NOT detach the ribbon cable. | |||
Using the supplied screws, carefully attach the lens to the sensor board. | |||
Now clip the circuit board back into the plastic housing. | |||
= Preparing the Camera Housing = | |||
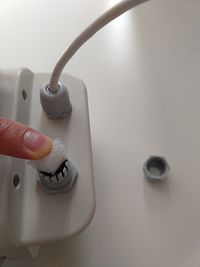
[[File:glands.jpg|200px|right|Glands in Place]] | |||
Fit the small cable gland to the housing and the ends of the PoE cable up through the smaller cable gland, but don't tighten it up yet. | |||
Fit the large cable gland in the other opening, and push a piece of plastic packing foam into it. This is to keep insects from getting in, but allow moisture out. | |||
Revision as of 17:05, 23 April 2021
WORK IN PROGRESS PLEASE REFER TO GOOGLE DOC FOR NOW
Parts and Tools needed
Click on the image to the right to see a larger version with the parts labelled
- IMX291 sensor board
- Lens with the lens holder - 4mm, 6mm are M16 mount as pictured, while other lenses might be CS which have a different holder
- 2x M2 screws (they come with the camera board)
- Camera housing
- Small cable gland (normally comes with the housing)
- Large cable gland (normally comes with the housing)
- PoE cable (should be available from the camera seller)
- Camera board holder (comes with the housing, but you might have to tell the seller to send one)
- Holder metal plate (comes with the board holder)
- 3x M2 screws, 12 mm long (purchase separately)
- 1x M3-.50 screws, 6mm long (purchase locally)
- Metal plate screws (they come with the housing)
- Transparent weatherproof silicone (buy locally)
- Housing bracket (buy this with the housing)
- Waterproof ethernet cable protector
The Camera, lens, camera housing, PoE cable, board holder, plate and cable glands can be bought from AliExpress. There may be other sources.
You will also need small wire cutters and various size screwdrivers.
Assembly
Preparing the lens
Start by removing protective covers from the sensor and lens. Take care not to touch the sensor after this!
The cameras come with an IR Block filter in the lens holder. We don't want this, so unscrew the lens from the holder and using a screwdriver, carefully punch out the filter as shown in the image on the right. Make sure there are no shards left.
On the underside of the lens holder you'll see two plastic nubbins. These get in the way, so using the wire cutters. snip them off, then screw the lens back into the lens holder.
Attaching the lens
Carefully unclip the circuit board from the plastic holder, but DO NOT detach the ribbon cable. Using the supplied screws, carefully attach the lens to the sensor board.
Now clip the circuit board back into the plastic housing.
Preparing the Camera Housing
Fit the small cable gland to the housing and the ends of the PoE cable up through the smaller cable gland, but don't tighten it up yet.
Fit the large cable gland in the other opening, and push a piece of plastic packing foam into it. This is to keep insects from getting in, but allow moisture out.


