The last steps: Difference between revisions
RadimStano (talk | contribs) |
|||
| (8 intermediate revisions by one other user not shown) | |||
| Line 1: | Line 1: | ||
Ahoj! In this section, you will put your camera into the production stream on the server side by finishing configuration of RMS software in Linux. | Ahoj! In this section, you will put your camera into the production stream on the server side by finishing configuration of RMS software in Linux. | ||
= Automated setup via script = | |||
The script will guide you through this process, but you will need these in advance: | The script will guide you through this process, but you will need these in advance: | ||
*'''Station code''' - you have requested it previously - if not please do so now by sending an email to denis.vida@gmail.com with a short introduction, stating that you are building the camera, stating from which country you are and asking for the station code. You will need it later when setting up the RMS software once your camera is fully installed and positioned. | |||
*'''GPS coordinates of your camera''' - see the script, it is explaining how to obtain these or scroll down and check the section *Determining the location of the camera* | |||
Once you got this information, proceed with the automated configuration script. | |||
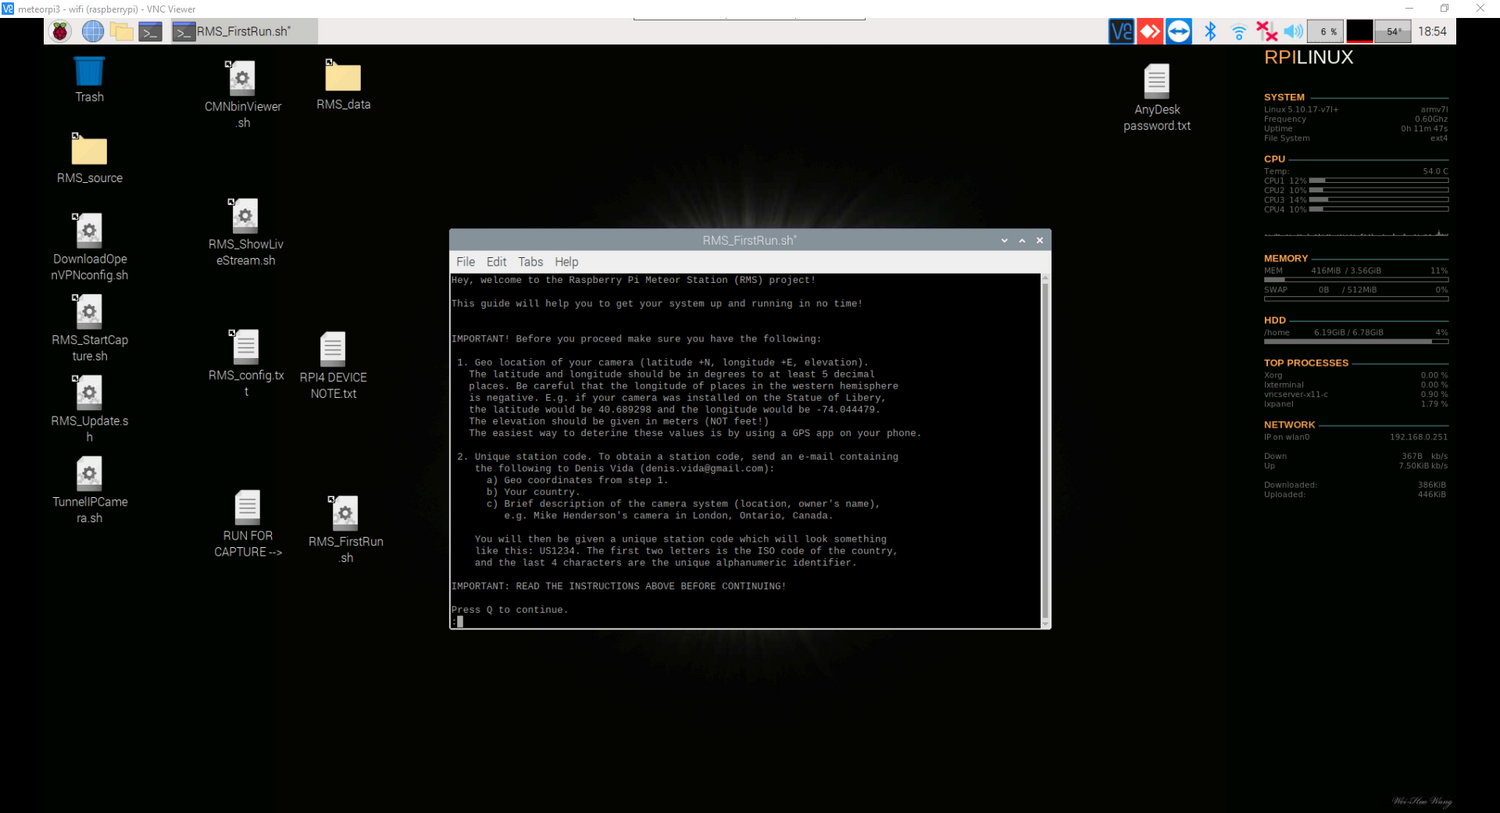
This is what you should see when you boot your Raspberry Pi and connect to it via VNC (or AnyDesk): | |||
[[File:The_first_boot_raspi.png|1500px|center]] | |||
Follow the instructions on the screen: | |||
*Press Q to continue | |||
*Press ENTER to continue | |||
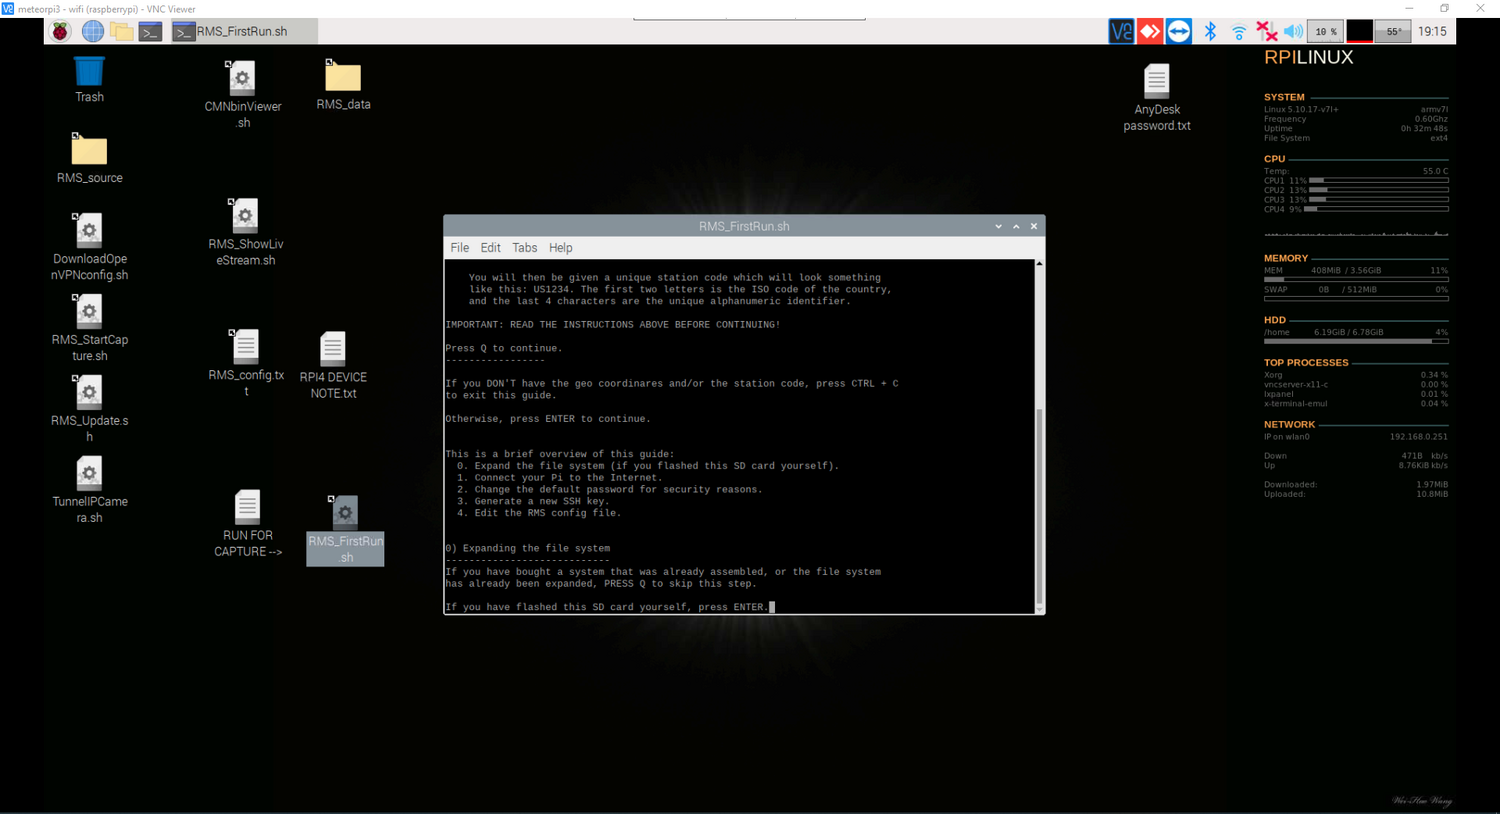
Now the script will explain what lies ahead of you: | |||
[[File:The_first_boot_raspi_1.png|1500px|center]] | |||
Follow the instructions on the screen: | |||
*If you have flashed this SD card yourself, press ENTER. | |||
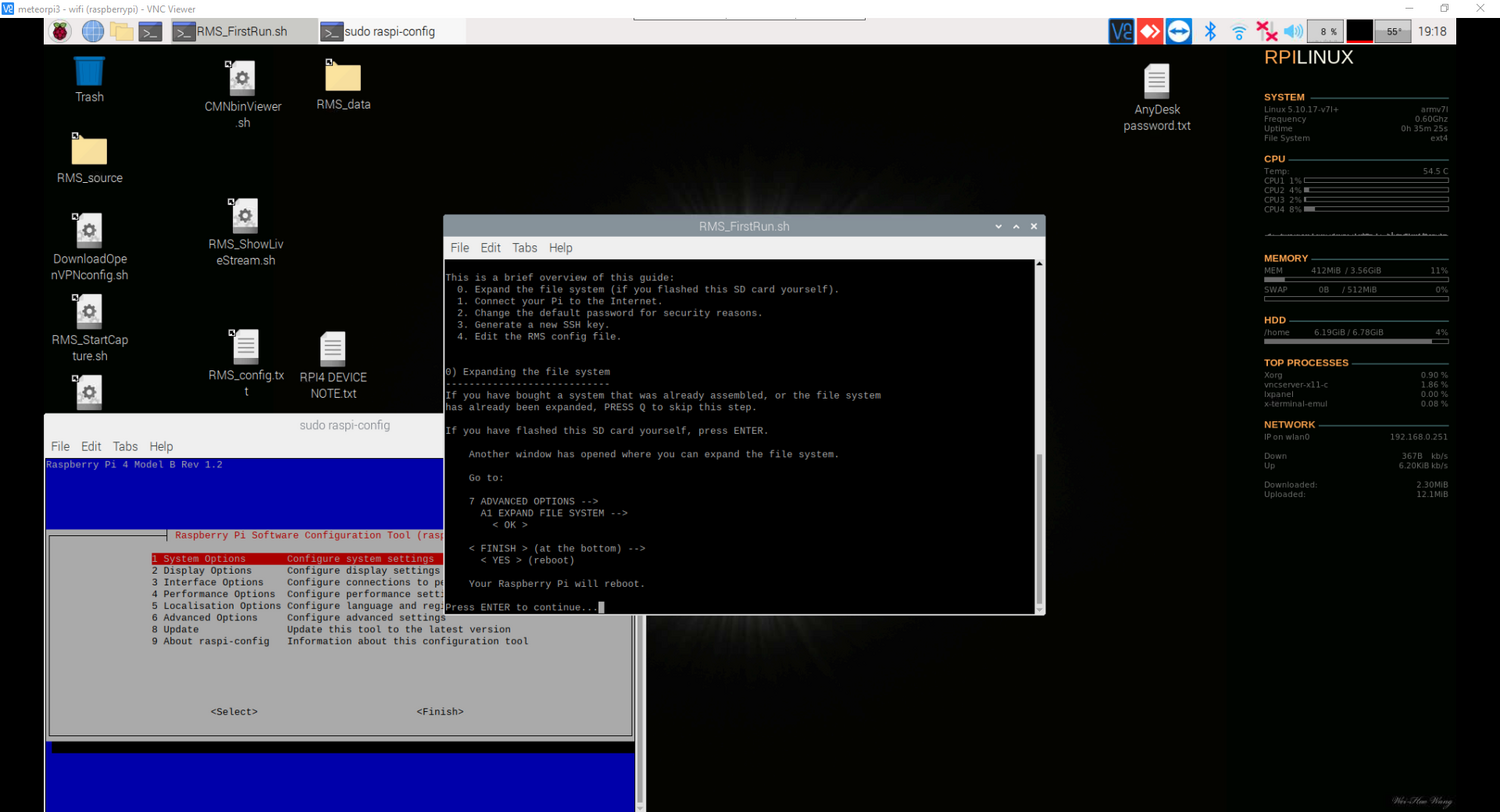
Now the script will open a new window and give you exact instructions on how to expand the filesystem (to use the full capacity of the SD card/USB key). Follow these instructions: | |||
[[File:The_first_boot_raspi_2.png|1500px|center]] | |||
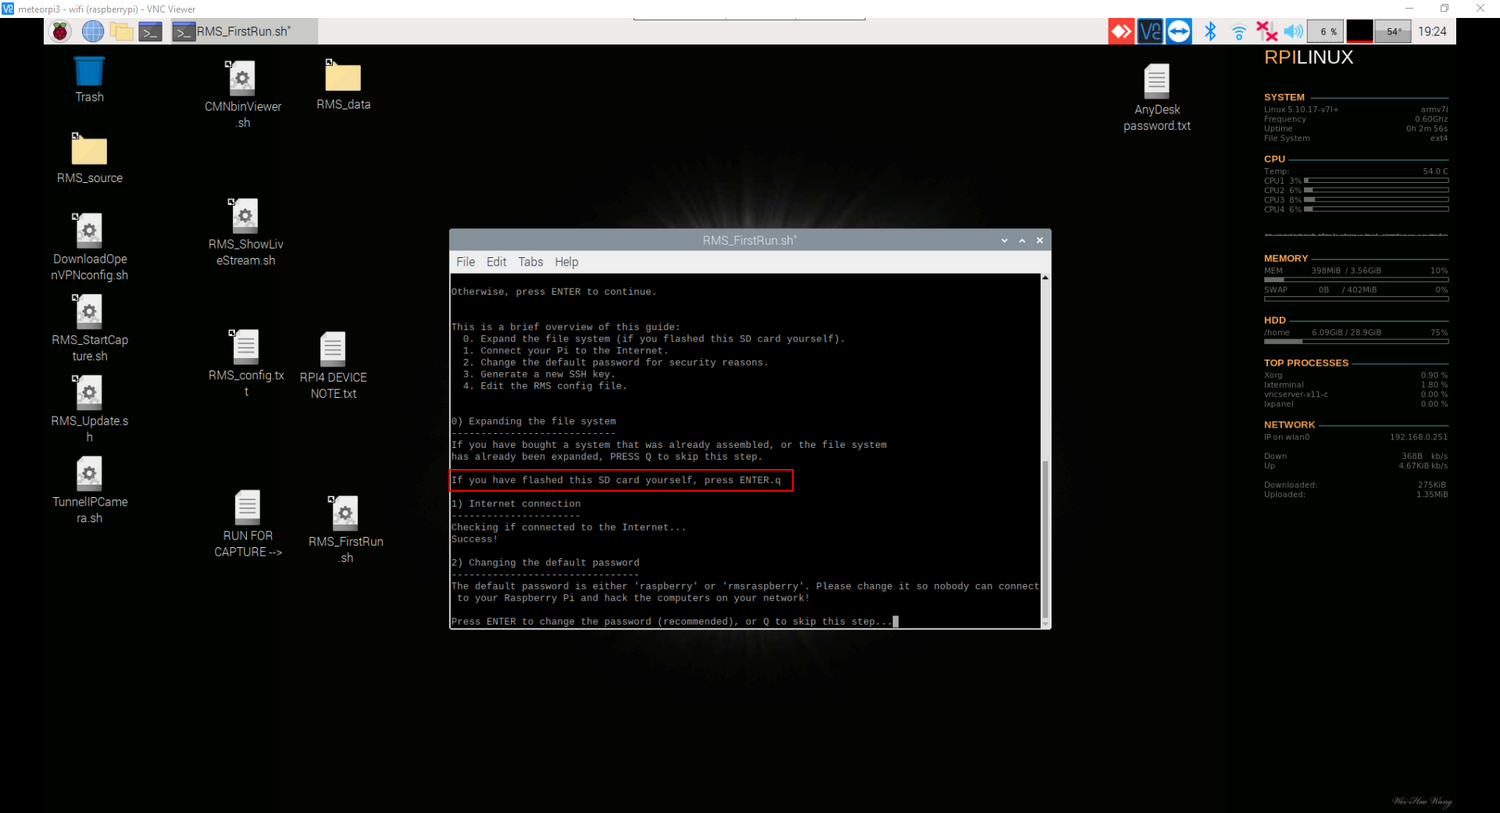
Now wait for the boot of your Raspberry Pi and once it is up, connect to it the usual way. Unfortunately, you will need to do all the previous steps except for the Filesystem expansion, where instead of pressing ENTER, you will press Q this time and then the script will check its Internet connection and asks you to change the password - please do so, use a strong password and save it in your favourite Password manager (e.g. KeePass). You will be asked to provide the current password, which is "rmsraspberry" without quotes. | |||
[[File:The_first_boot_raspi_3.png|1500px|center]] | |||
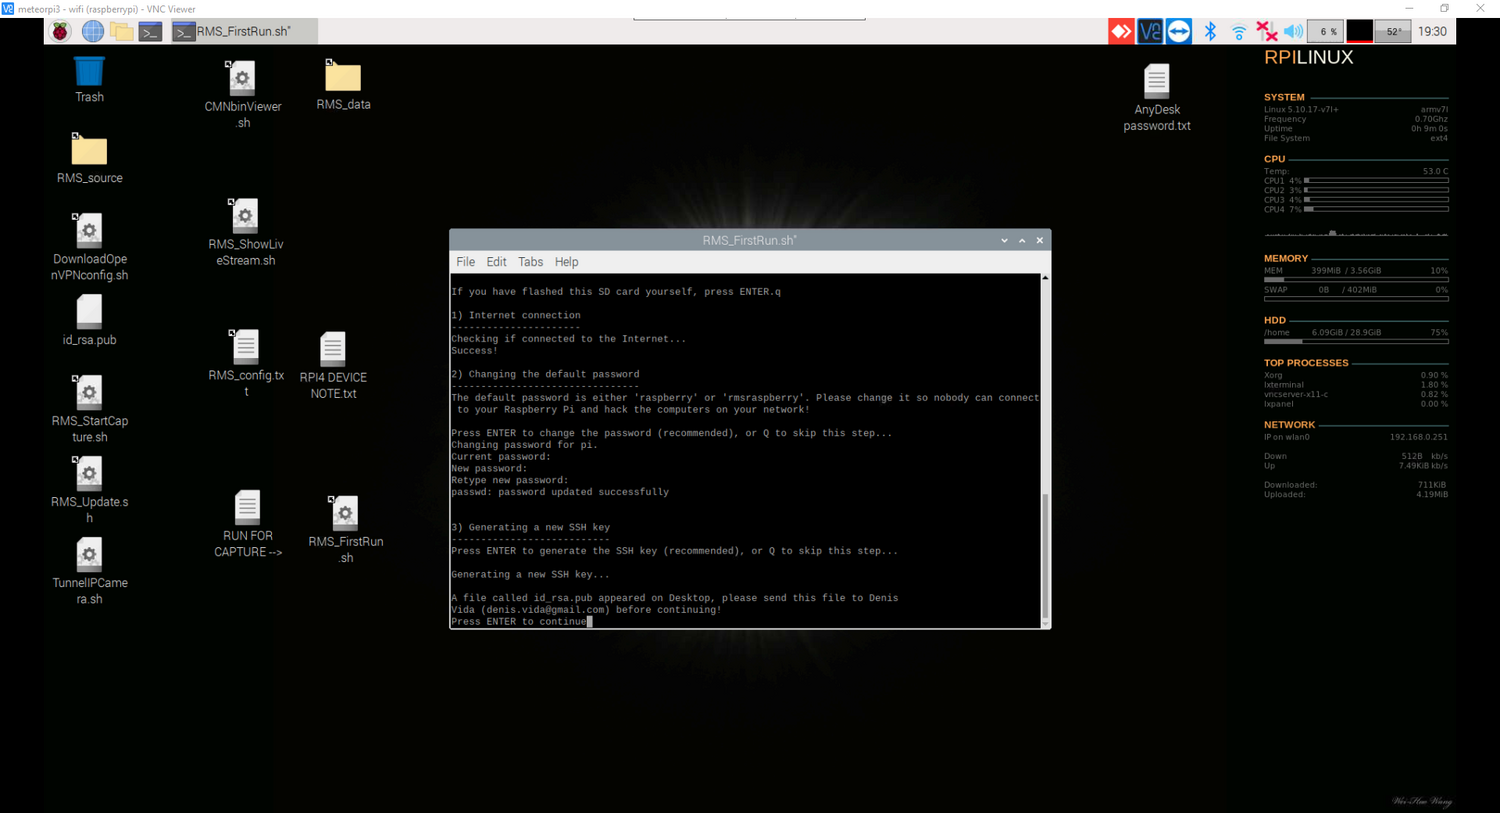
Now the SSH keys used to upload data to the GMN server will be generated - press ENTER, and wait until the SSH keys are generated. Send the SSH key to denis.vida@gmail.com as per instructions (if you are not sure, see the *Generating an SSH key*section below), you can reply to the email where you have received your station code. | |||
[[File:The_first_boot_raspi_4.png|1500px|center]] | |||
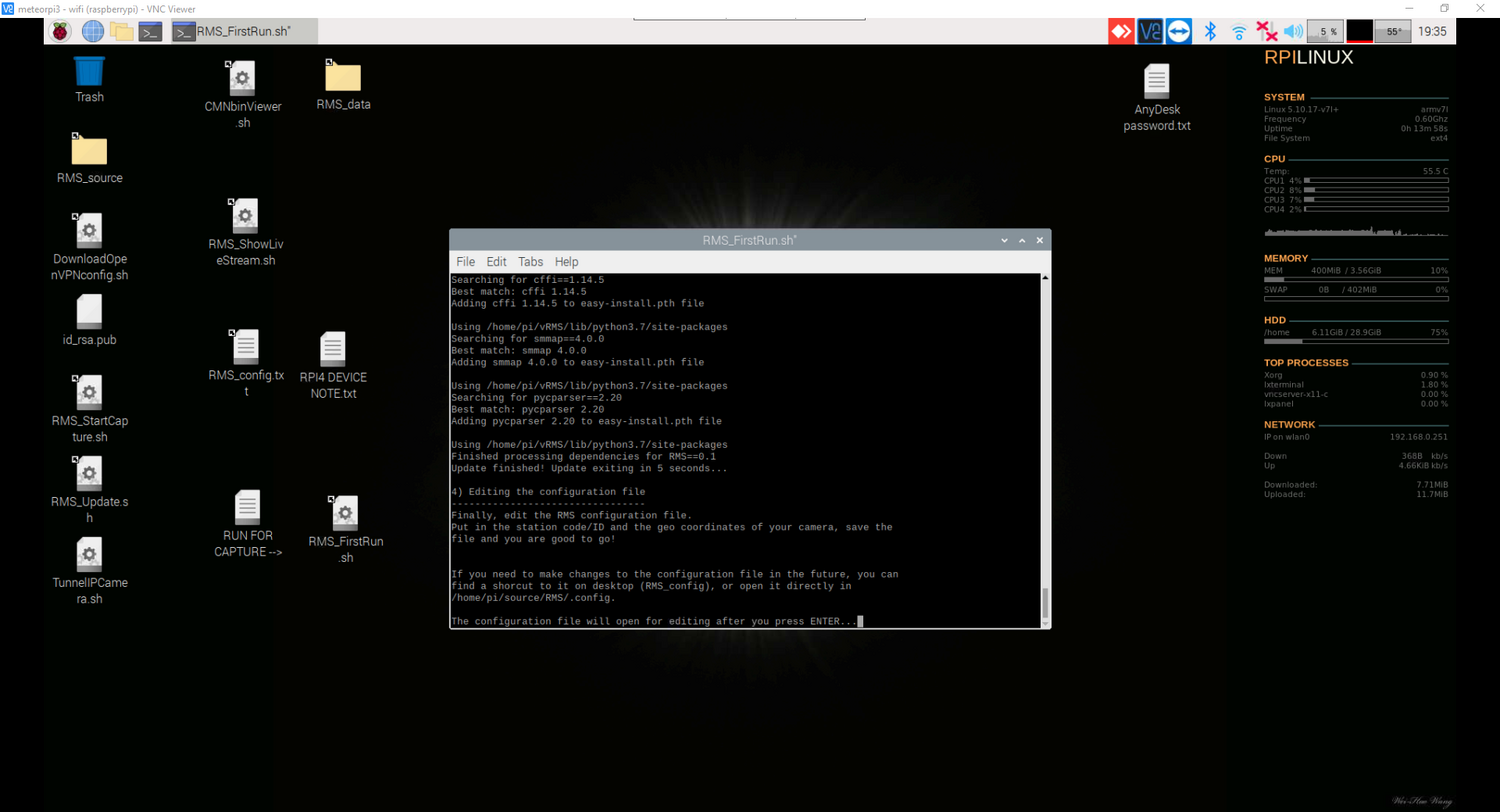
Press ENTER to continue. Now the RMS will update itself, please wait until done (this may take some time depending on the speed of your internet connection). Once it is done press ENTER to open the configuration file: | |||
[[File:The_first_boot_raspi_5.png|1500px|center]] | |||
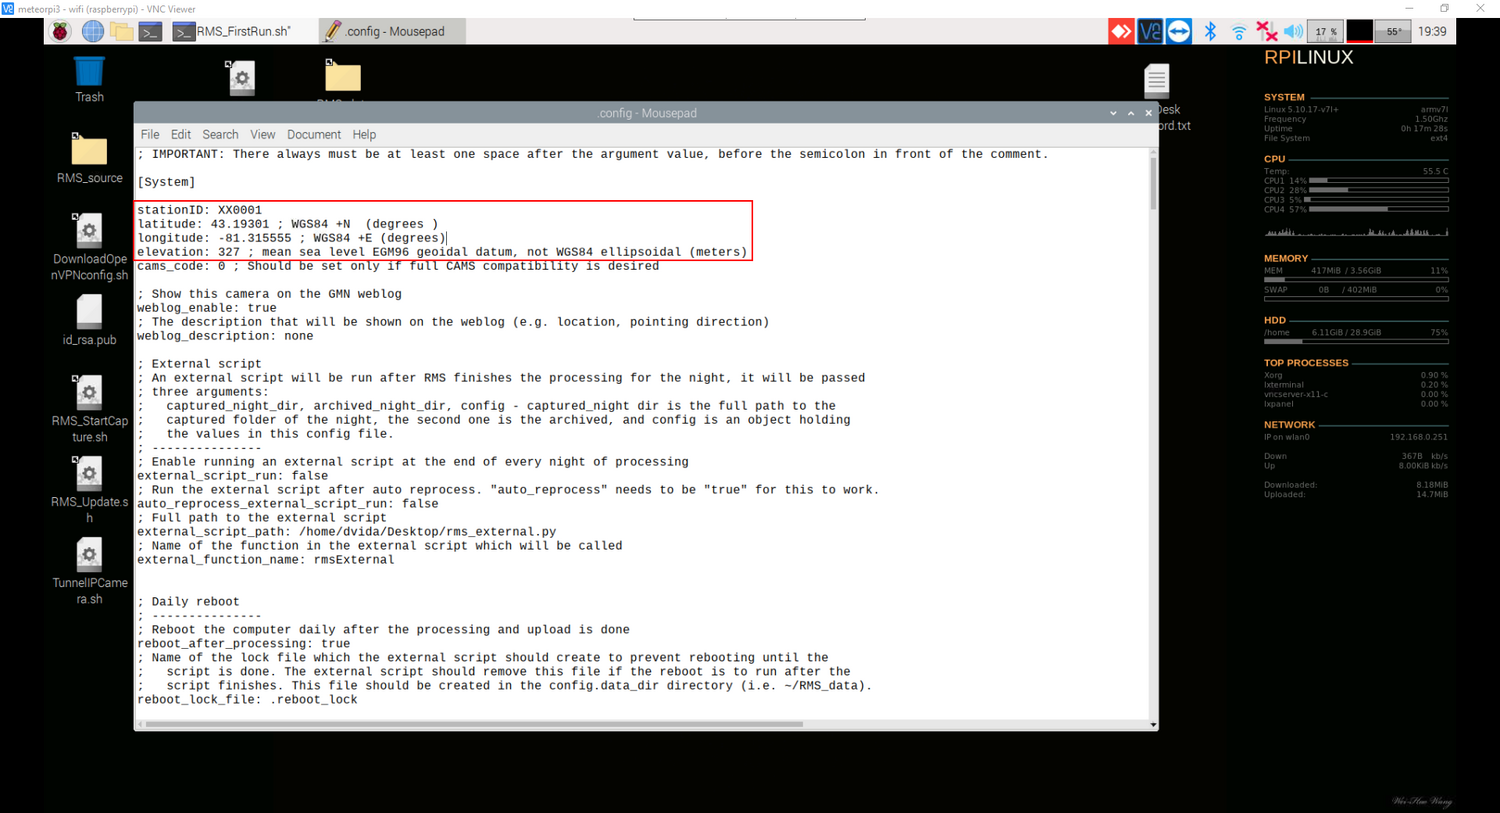
A new window is open, move it and enlarge it so you have a better view. Edit your station code, latitude, longitude and elevation. | |||
[[File:The_first_boot_raspi_6.png|1500px|center]] | |||
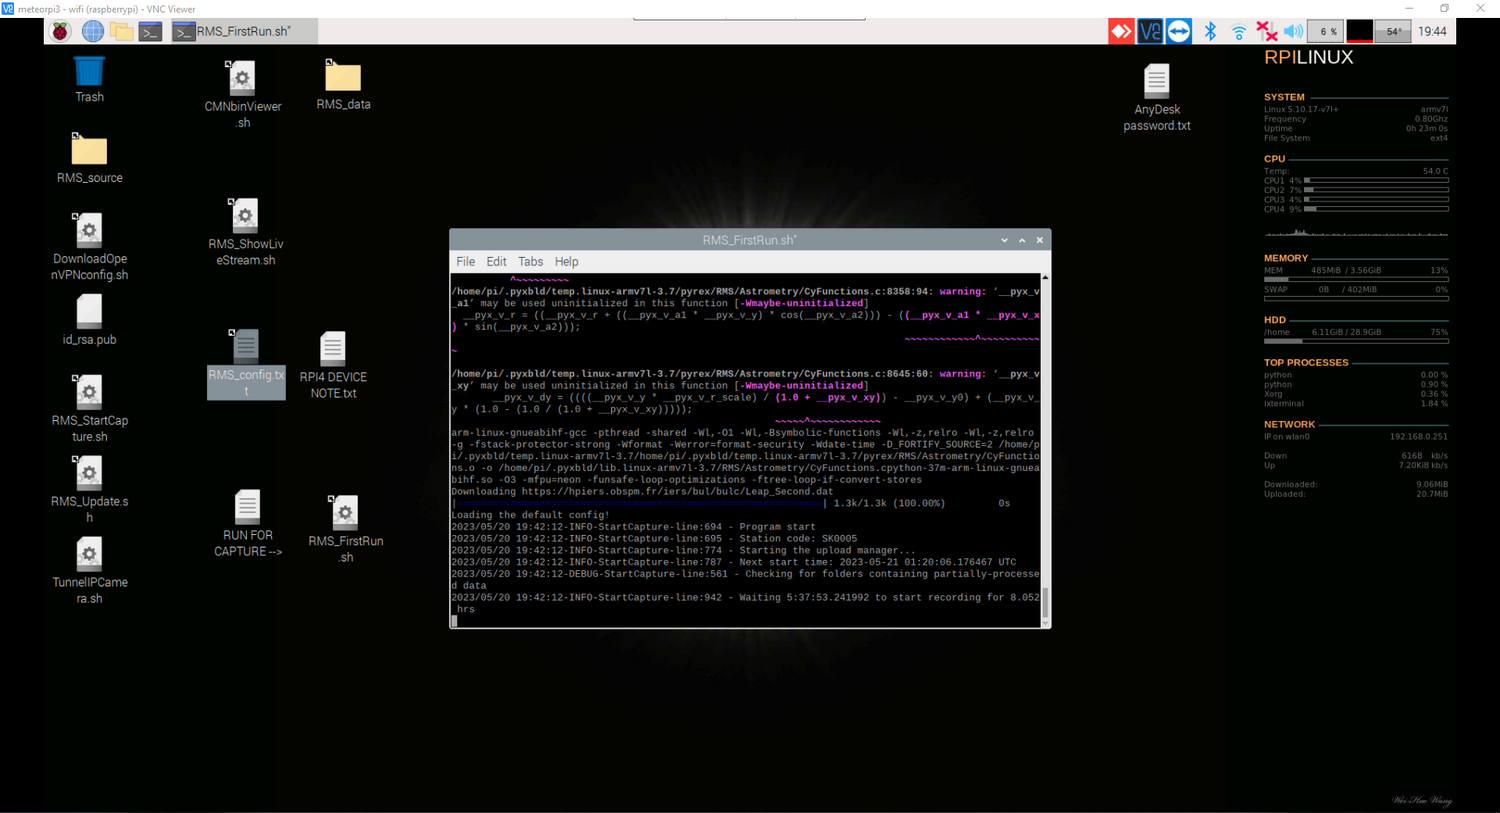
Then save the file by clicking File -> Save (or CTRL + S) and close the window File -> Close window (or CTRL + Q). Then the RMS software will be started and you are ready for your first capture. It will look like this: | |||
[[File:The_first_boot_raspi_7.png|1500px|center]] | |||
Now you are finished with this section and you may scroll down the page or proceed directly there: [https://globalmeteornetwork.org/wiki/index.php?title=Build_%26_Install_%26_Setup_your_camera_-_The_complete_how-to Back to the signpost page.] | |||
= Manual setup via command line = | = Manual setup via command line = | ||
| Line 27: | Line 60: | ||
== Determining the location of the camera == | == Determining the location of the camera == | ||
To participate in the network you will need a unique station code. We will generate one for you once you let us know the exact geographical location of the camera. Measuring the precise location of the camera is very important for triangulating meteor trajectories - the location of | To participate in the network, you will need a unique station code. We will generate one for you once you let us know the exact geographical location of the camera. Measuring the precise location of the camera is very important for triangulating meteor trajectories - the location of your camera will not be shared with anyone without your consent. | ||
How to do it: | How to do it: | ||
Even though GPS apps on your smartphone *claim* they're accurate to about 3 m, they can often be off 10x as much. The best source of coordinates is Google Earth, which provides an excellent estimate of terrain elevation. The final elevation should be terrain + height of the camera above the ground. | |||
Please use the precision for the longitude and latitude of at least 5 decimal places (or to within one “), and the elevation to a meter. | |||
=== Note about measuring elevation === | |||
The RMS config file expects height above the EGM96 geoid (mean sea level). Most professional and older GPS devices provide height above the WGS84 ellipsoid. The difference between the two conventions can be up to 100 m, depending on where on the planet you are. | |||
Most phone apps report in EGM96 (unless stated otherwise), but their elevations can be significantly off from the real value due to measurement uncertainty. | |||
Google Earth uses the EGM96 geoid for its elevation data, which represents mean sea level, so Google Earth elevations are compatible with what RMS expects. It uses an elevation dataset measured from orbit using radar, which is very accurate. | |||
If using a dedicated GPS device that outputs raw ellipsoidal heights (WGS84), you'll need to apply a geoid correction. There is a converter in RMS (RMS/EGM96GeoidHeight.py), but the easiest is just to use Google Earth + structure height. | |||
Using the RMS utility: | |||
To convert WGS84 Ellipsoid height to EGM96 Geoid AMSL height: | |||
python -m RMS.GeoidHeightEGM96 --inverse <latitude> <longitude> <wgs84_height> | |||
python -m RMS.GeoidHeightEGM96 --inverse 40.7128 -74.0060 100.5 | |||
To convert EGM96 Geoid AMSL height to WGS84 Ellipsoid height: | |||
python -m RMS.GeoidHeightEGM96 <latitude> <longitude> <egm96_height> | |||
python -m RMS.GeoidHeightEGM96 40.7128 -74.0060 133.52 | |||
It simply looks up the delta in a database (that's the only way the natural shape of the geoid is defined), interpolated for the exact position, and applies the delta. | |||
== Generating an SSH key == | == Generating an SSH key == | ||
Latest revision as of 16:20, 1 June 2025
Ahoj! In this section, you will put your camera into the production stream on the server side by finishing configuration of RMS software in Linux.
Automated setup via script
The script will guide you through this process, but you will need these in advance:
- Station code - you have requested it previously - if not please do so now by sending an email to denis.vida@gmail.com with a short introduction, stating that you are building the camera, stating from which country you are and asking for the station code. You will need it later when setting up the RMS software once your camera is fully installed and positioned.
- GPS coordinates of your camera - see the script, it is explaining how to obtain these or scroll down and check the section *Determining the location of the camera*
Once you got this information, proceed with the automated configuration script.
This is what you should see when you boot your Raspberry Pi and connect to it via VNC (or AnyDesk):
Follow the instructions on the screen:
- Press Q to continue
- Press ENTER to continue
Now the script will explain what lies ahead of you:
Follow the instructions on the screen:
- If you have flashed this SD card yourself, press ENTER.
Now the script will open a new window and give you exact instructions on how to expand the filesystem (to use the full capacity of the SD card/USB key). Follow these instructions:
Now wait for the boot of your Raspberry Pi and once it is up, connect to it the usual way. Unfortunately, you will need to do all the previous steps except for the Filesystem expansion, where instead of pressing ENTER, you will press Q this time and then the script will check its Internet connection and asks you to change the password - please do so, use a strong password and save it in your favourite Password manager (e.g. KeePass). You will be asked to provide the current password, which is "rmsraspberry" without quotes.
Now the SSH keys used to upload data to the GMN server will be generated - press ENTER, and wait until the SSH keys are generated. Send the SSH key to denis.vida@gmail.com as per instructions (if you are not sure, see the *Generating an SSH key*section below), you can reply to the email where you have received your station code.
Press ENTER to continue. Now the RMS will update itself, please wait until done (this may take some time depending on the speed of your internet connection). Once it is done press ENTER to open the configuration file:
A new window is open, move it and enlarge it so you have a better view. Edit your station code, latitude, longitude and elevation.
Then save the file by clicking File -> Save (or CTRL + S) and close the window File -> Close window (or CTRL + Q). Then the RMS software will be started and you are ready for your first capture. It will look like this:
Now you are finished with this section and you may scroll down the page or proceed directly there: Back to the signpost page.
Manual setup via command line
Capture software
The recording program is called RMS.StartCapture. A script that auto-updates the code is called RMS_FirstRun and it will start automatically when the RPi boots up, after which the recording loop will start. Note that during the update procedure, the config file will be reset. Please wait until the update is done, and your old config file will be copied back.
The capture will automatically start with sundown and stop with sunrise, although this is very dependent on the correct location of the camera being entered in the configuration file (see the Configuration section below). Configuration Changing the system password If you haven’t changed your password during the initial configuration through the terminal window, so we strongly recommend that you change it.
How to do it:
Boot up your RPi. Open the terminal by clicking Start (RPi icon) → Accessories → Terminal In the window that pops up, type passwd and press enter. You will be asked to enter your current password - which is raspberry or rmsraspberry - and then your new password. Keep this new password in a secure place.
Determining the location of the camera
To participate in the network, you will need a unique station code. We will generate one for you once you let us know the exact geographical location of the camera. Measuring the precise location of the camera is very important for triangulating meteor trajectories - the location of your camera will not be shared with anyone without your consent.
How to do it: Even though GPS apps on your smartphone *claim* they're accurate to about 3 m, they can often be off 10x as much. The best source of coordinates is Google Earth, which provides an excellent estimate of terrain elevation. The final elevation should be terrain + height of the camera above the ground. Please use the precision for the longitude and latitude of at least 5 decimal places (or to within one “), and the elevation to a meter.
Note about measuring elevation
The RMS config file expects height above the EGM96 geoid (mean sea level). Most professional and older GPS devices provide height above the WGS84 ellipsoid. The difference between the two conventions can be up to 100 m, depending on where on the planet you are.
Most phone apps report in EGM96 (unless stated otherwise), but their elevations can be significantly off from the real value due to measurement uncertainty. Google Earth uses the EGM96 geoid for its elevation data, which represents mean sea level, so Google Earth elevations are compatible with what RMS expects. It uses an elevation dataset measured from orbit using radar, which is very accurate.
If using a dedicated GPS device that outputs raw ellipsoidal heights (WGS84), you'll need to apply a geoid correction. There is a converter in RMS (RMS/EGM96GeoidHeight.py), but the easiest is just to use Google Earth + structure height.
Using the RMS utility:
To convert WGS84 Ellipsoid height to EGM96 Geoid AMSL height:
python -m RMS.GeoidHeightEGM96 --inverse <latitude> <longitude> <wgs84_height> python -m RMS.GeoidHeightEGM96 --inverse 40.7128 -74.0060 100.5
To convert EGM96 Geoid AMSL height to WGS84 Ellipsoid height:
python -m RMS.GeoidHeightEGM96 <latitude> <longitude> <egm96_height> python -m RMS.GeoidHeightEGM96 40.7128 -74.0060 133.52
It simply looks up the delta in a database (that's the only way the natural shape of the geoid is defined), interpolated for the exact position, and applies the delta.
Generating an SSH key
Every morning all meteor detections from the previous night are uploaded to the server, where trajectories and orbits of meteors are estimated. The system uses a secure way of talking to our server at the University of Western Ontario, and for that to work you need to generate an SSH key for your RPi and send it to us.
How to do it: Boot up your RPi Open the terminal by clicking Start (RPi icon) → Accessories → Terminal Type: ssh-keygen -t rsa -m PEM and press enter You will be asked where to save the SSH key, but just press enter. If it asks you to overwrite the existing key, type y and press enter. You will be asked for a passphrase two times. Don’t type anything and just press enter both times. Type cat ~/.ssh/id_rsa.pub and press enter. Your SSH key will be printed to the terminal. The key starts with “ssh-rsa”, followed by a long string of characters, and it ends with “pi@raspberry”. Copy the whole key and send it to yourself via e-mail, or in any other way to keep it for later.
Obtaining the station code
Send an e-mail to denis.vida@gmail.com with a short description of your camera, the country where the camera is located in, the geographical coordinates and the SSH key you have generated and copied in the step above. Also, send an approximate pointing of the camera - the azimuth measured from due North, and the elevation. You can measure the azimuth using a compass (or an compass app), and you can eyeball the elevation (0 degrees being the horizon, 90 degrees the zenith, i.e. straight up). You will receive your unique station code within a period of several days at most. The station code consists of the ISO Alpha-2 country code followed by four alphanumeric characters, e.g. US00A2.
Modifying the configuration file
Boot up your RPi On the desktop there is a file called “RMS config”, open it. Under the “[System]” section, write the station ID and the coordinates of your camera, which should look something like this: [System] stationID: CA0003 latitude: 42.7961 ; +N in degrees longitude: -81.84219 ; +E in degrees elevation: 312 ; meters
Make sure to leave a space before the semicolon at the end of the line! For example: Good: latitude: 42.7961 ; +N in degrees Bad: latitude: 42.7961; +N in degrees
Under the “[Upload]” section, change:
upload_enabled: false
To:
upload_enabled: true
Save the file by pressing File → Save. All done!
Making a detection mask
If there is something in the field of view of the camera, e.g. a tree, a building, roof, etc., it may interfere with the detection. The way to fix this is to create a detection mask.
If you don’t have anything in your field of view, you don’t have to do anything!
Alternatively you may ask Denis to help you with the detection mask @ denis.vida@gmail.com.
Calibration
After the first clear night of operation, the system will image some stars. Let Denis know @ denis.vida@gmail.com that your station uploaded some good data to the server, and based on that we will generate an astrometric plate. The plate is basically a way of converting image coordinates to celestial coordinates, and you will need to put on your RPi once we send it to you. We will send you a platepar_cmn2010.cal file, just ask us for one!
Download the platepar_cmn2010.cal to your RPi. Copy it into ~/source/RMS/ All done! Your system will automatically calibrate the data it records every night, and this data will be used to estimate meteor trajectories and orbits on the server!
If you want to do the calibration yourself, you can do that yourself on your Raspberry Pi following this video - it is fun and you will try software called SkyFit2:
You are now done with this section and now you may proceed with the optional steps, please make sure to at least go through the optional steps. Back to the signpost page.
