SkyFit2: Difference between revisions
No edit summary |
|||
| (11 intermediate revisions by 2 users not shown) | |||
| Line 1: | Line 1: | ||
SkyFit2 is a tool used to make astrometric plates and photometric calibrations. An astrometric plate is used to convert measurements on the image to coordinates in the sky (e.g. right ascension and declination). Photometric calibration converts the image pixel intensity to magnitude. | |||
We aim to make SkyFit as user-friendly and universal as possible. It aims to support all optical meteor data formats in existence (videos and still images), as well as calibrating dashcams. | |||
= | A full video tutorial is available on [https://www.youtube.com/watch?v=ao3J9Jf0iLQ YouTube]. | ||
=== Example data === | |||
= | Here is some data if you don't have any of your own yet: [https://www.dropbox.com/s/gy023qg7bsobrjp/RU_fireball_20190910.zip?dl=0 data link] | ||
This is data from one fireball observed over the Caucasus Mountains in 2019. You should have everything here for a trajectory solution, and one is already provided in the software. Note that the .config files might be hidden - files beginning with a dot are hidden by default in Linux. | |||
= SkyFit2 Anatomy = | |||
This section describes the various physical features of the SkyFit2 GUI. | |||
== SkyFit Mode == | |||
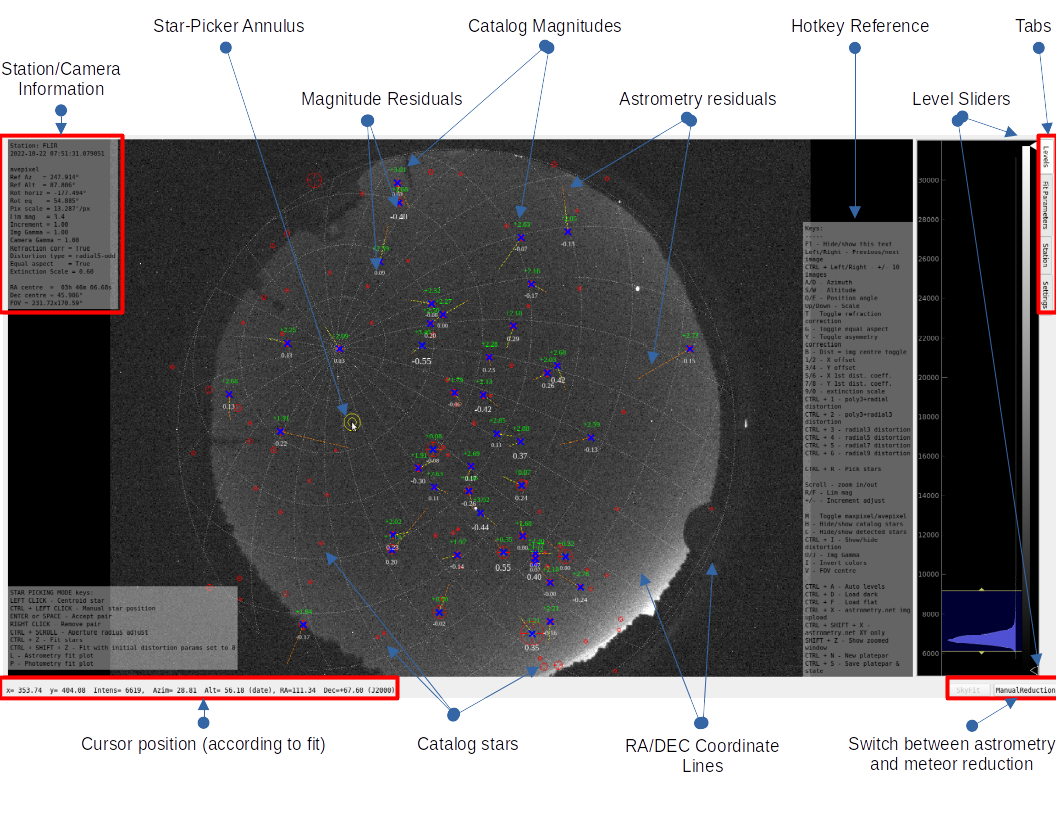
=== | === Image Display & Levels === | ||
[[File:WikiImgDisplay.png]] | |||
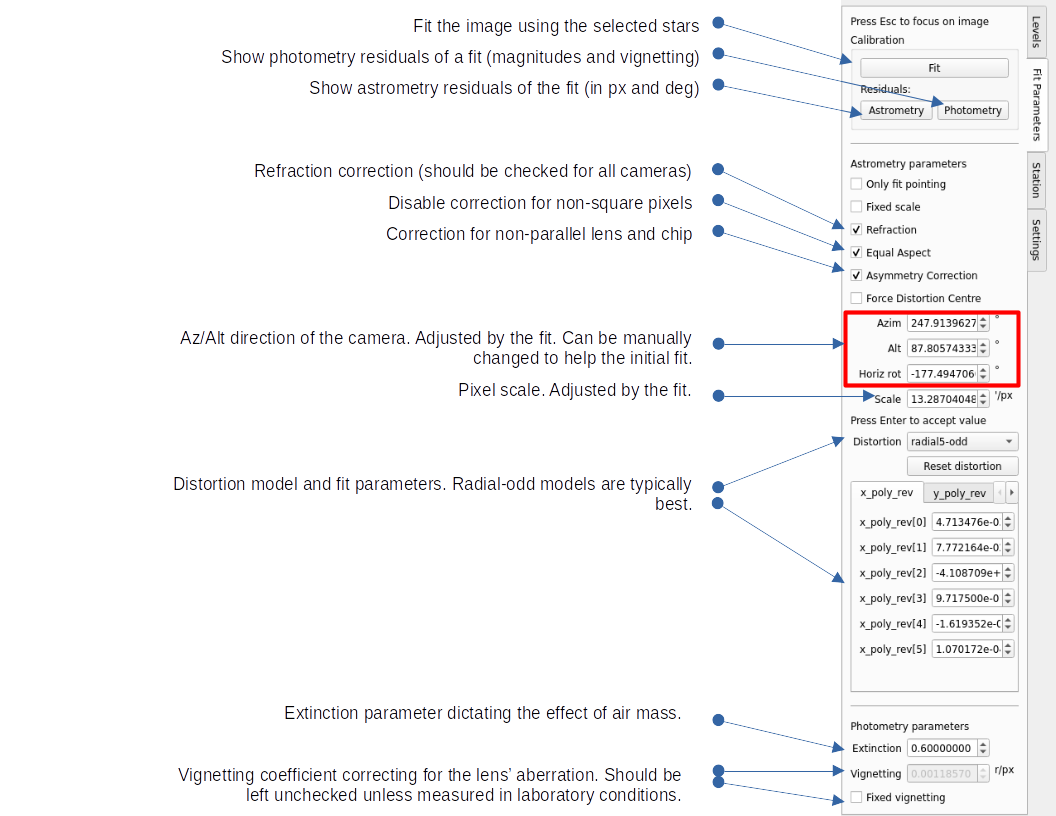
=== Fit Parameters Tab === | |||
[[File:WikiFitParams.png]] | |||
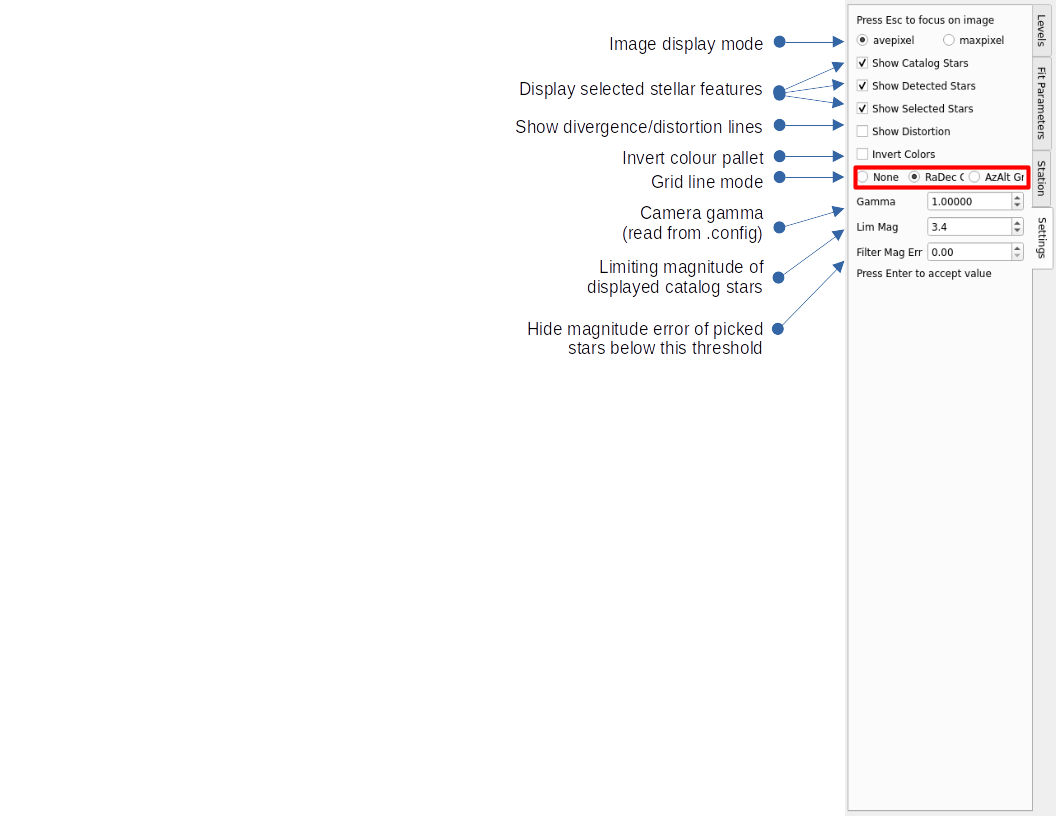
=== Settings Tab === | |||
[[File:WikiSettingsTab.png]] | |||
== ManualReduction Mode == | |||
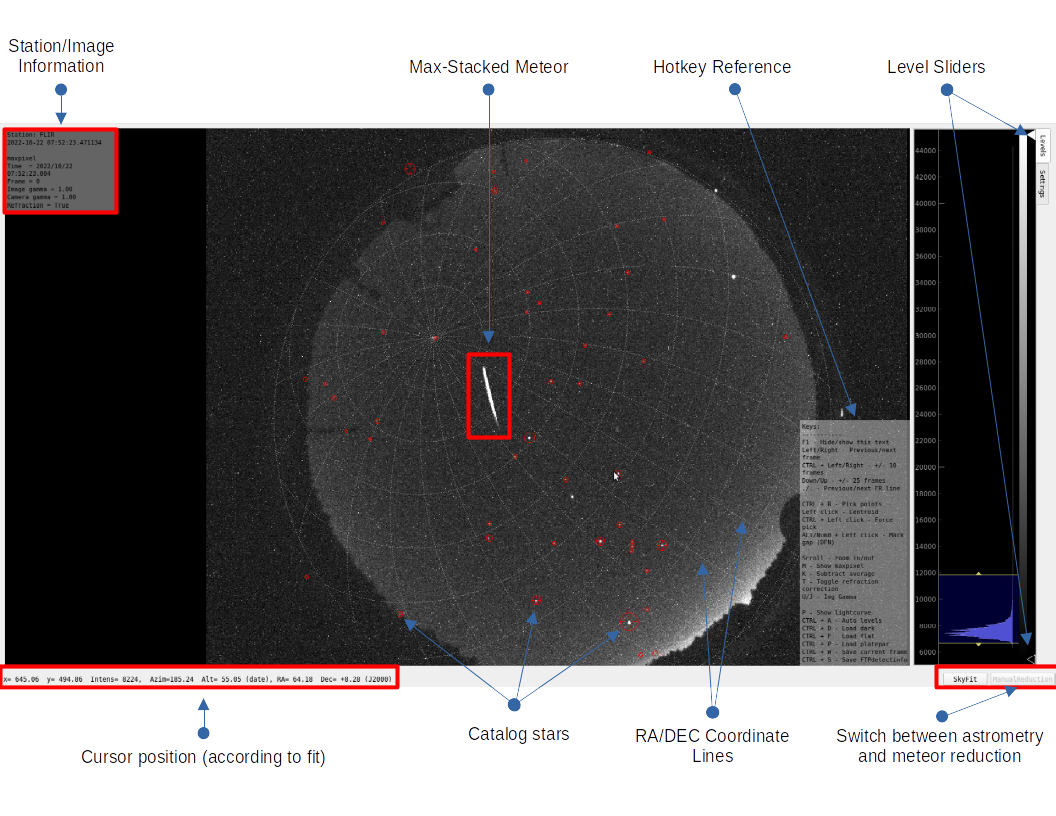
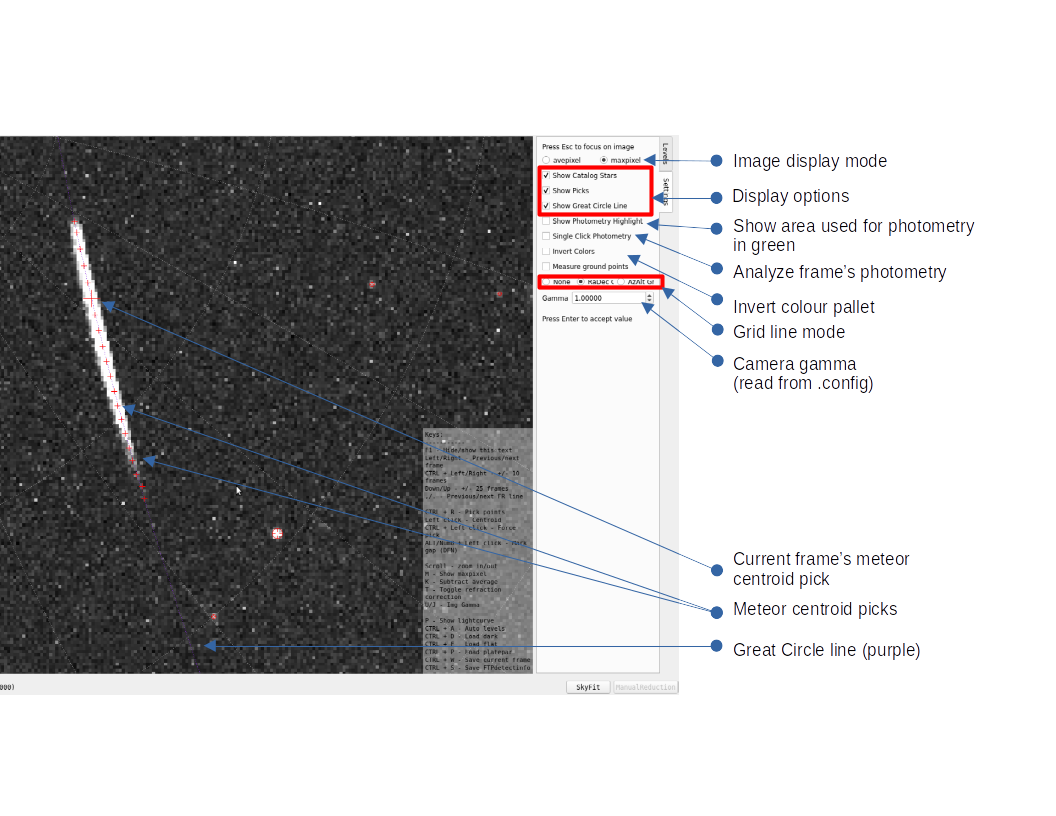
=== Image Display & Levels === | |||
[[File:WikiImgDisplay2.png]] | |||
=== Settings Tab === | |||
[[File:WikiSettingsTab2.png]] | |||
= Create or Upgrade a Plate with SkyFit2 = | |||
This page seeks to walkthrough how to create a new plate or upgrade an old plate using RMS SkyFit2 GUI. | |||
== Getting Started == | |||
To run SkyFit2, first install the RMS git repository and environment. Then run the command | |||
python -m Utils.SkyFit2 INPUT_PATH [-c/--config CONFIG_PATH][-t/--timebeg TIME][-f/--fps FPS][-g/--gamma GAMMA] | |||
This opens the Sky``Fit2 GUI with whatever data is in the directory specified by "INPUT_PATH". Alternatively, can also be a path to a video file or a state file. Make sure to customize the config file to the proper specifications before running this program. The most common options are detailed below: | |||
* Config: Path to the directory containing the appropriate .config file. Default to the DETECTION_PATH. | |||
* Timebeg: Beginning time of the detection in YYYYMMDD_hhmmss.uuuuuu format. | |||
* Fps: Frames per second when images are used. This option overrides the framerate given in from the config file. | |||
* Gamma: Camera gamma value (typically 0.45 or 1.0). This option overrides the framerate read in from the config file | |||
Upon opening, a request for a plate (platepar .cal file) will occur. If you wish to update a plate, select this here. If you wish to make a new plate, simply close this window. | |||
=== Using RMS data === | |||
Collect the desired data in a directory (e.g. /PATH/TO/DATA/DIRECTORY). The directory should contain an FF and an FR file if you're reducing a fireball. Make sure to also copy the required .config file and the platepar_cmn2010.cal if present. | |||
Then run: | |||
python -m Utils.SkyFit2 /PATH/TO/DATA/DIRECTORY --config . --fr | |||
This will load the given data files. | |||
=== Using FRIPON data === | |||
FRIPON data are usually given as a bunch of individual frames in a FITS format. It is very important that all files have a .fit extension (not .fits). SkyFit2 will automatically read the header and download the station coordinates, so you don't have to specify a config file. If the data are in /PATH/TO/DATA/DIRECTORY, simply run: | |||
python -m Utils.SkyFit2 /PATH/TO/DATA/DIRECTORY | |||
=== Using GFO/DFN data === | |||
DFN data are given as .NEF files in the raw Nikon format. To load a GFO image in SkyFit, you will need a dfnstation.cfg file which is usually present on the system. Copy both a .NEF image and the dfnstation.cfg in a standalone directory called e.g. /PATH/TO/DATA/DIRECTORY. | |||
Then run: | |||
python -m Utils.SkyFit2 /PATH/TO/DATA/DIRECTORY --config . | |||
SkyFit will ask you to choose the .NEF file. | |||
Properly calibrating and reducing GFO data can be a bit tricky. The recommended procedure is the following: | |||
* Take a calibration image (the one with the nominally longer exposure) and put it in a separate "calib" directory. Make sure that lots of stars are visible and that there are at least a few very close to the horizon. | |||
* Fit a radial plate (starting with radial3-odd, then fit a radial5-odd, finishing with a radial7-odd), with the asymmetry correction and equal aspect turned on. Set the extinction scale to 0.6 and turn off a fixed vignetting coefficient option. When happy with the fit, hit CTRL + S to save and close SkyFit. | |||
* Prepare the fireball data in another directory and copy the platepar file from the calib directory. The data images have a shorter exposure, so fewer stars are visible. In the previous step, you fit the pointing and the distortion coefficients - because the lens is the same the distortion coefficients remain the same, but the pointing can drift over time. You need to re-calibrate on 10-20 stars but select the "Only fit pointing option". | |||
* Switch to the ManualReduction mode and start picking. Because the timing is encoded using a de Brujin sequence, the fireball consists of dots and gaps (1s and 0s). Start with an obvious dot, clicking it with your mouse. A red cross will appear. Advance to the next point ("frame") by pressing a right arrow key on your keyboard (note that the frame counter will increase). If the next point is a gap, select it with ALT + CLICK (or NUM0 + CLICK) - this will show up as a yellow cross. Keep going until you select all, and you can go back with a left arrow key in case you missed any. It is very important that the order of selected points is correct. Once you've selected about 10-20 points, switch to the Debrujin tab and click "Check sequence". This will try to find a unique solution for the time, but you might be offered with several options. You can choose one if you know the time, or close it and pick a few more points and try again. | |||
* If you want to do photometry, the background needs to be subtracted before pixel colouring is possible. Use a .NEF image that was taken just before or after the fireball as a dark frame by hitting CTRL + D and selecting the file. | |||
=== Using arbitrary video or image data === | |||
This section applies if: | |||
a) You are using a video from e.g. a security camera in either a .avi, .mp4, or in a .mov format. | |||
b) Or you are using a sequence of images (make sure their names are sorted alphabetically, e.g. frame001.png, frame002.png, etc.). Using just one image works too, then SkyFit2 will run in a special "single-image mode". | |||
You will need to make a custom configuration file and know the absolute time of the first frame. | |||
First, copy the .config file from the RMS source directory to the directory with the video and rename it with the name of the station (we'll use "London" as the station name), e.g. london.config. Then open this file and change the following entries: | |||
stationID: London | |||
latitude: 51.500761 ; WGS84 +N (degrees) - Use at least 5 decimal places and measure in Google Earth as accurately as possible | |||
longitude: -0.124585 ; WGS84 +E (degrees) | |||
elevation: 20 ; mean sea level EGM96 geoidal datum, not WGS84 ellipsoidal (meters) | |||
... | |||
width: 1280 ; Set the video resolution | |||
height: 720 | |||
fps: 25.0 ; frames per second | |||
... | |||
; Approx. horizontal Field-of-view in degrees | |||
fov_w: 87 | |||
; Approx. vertical Field-of-view in degrees | |||
fov_h: 45 | |||
; Deinterlacing -2 = global shutter, -1 = rolling shutter, 0 = even first, 1 = odd first | |||
deinterlace_order: -1 | |||
... | |||
star_catalog_file: BSC5 ; This sets a star catalog with bright stars | |||
... | |||
catalog_mag_limit: 4.0 ; Security cameras usually can't see stars fainter than this, but you can always adjust this later | |||
Then given the absolute UTC time of the first frame in the YYYYMMDD_hhmmss.uuuuuu format (e.g. 20230214_021629.0) and the path to the video file (e.g. /PATH/TO/DATA/DIRECTORY/video.mp4), run: | |||
python -m Utils.SkyFit2 /PATH/TO/DATA/DIRECTORY/video.mp4 --config . --timebeg 20230214_021629.0 | |||
If you are using a sequence of images, then give it the path to the directory which contains the images: | |||
python -m Utils.SkyFit2 /PATH/TO/DATA/DIRECTORY/ --config . --timebeg 20230214_021629.0 | |||
If you are using just one image, use the command above and SkyFit will ask which image to open (you should have only one in the directory, together with the config file). | |||
== Creating a Plate == | |||
*NOTE: When entering hotkey commands in SkyFit2, you must be in the main frame/viewer. | |||
Adjust the levels on the right as required or automatically set them by pressing ctrl+A. Once you are happy, begin to rotate the catalog stars into an approximately correct position using your keyboard. A/D control the azimuth, S/W control the altitude, Q/E control the position angle, and Up/Down controls the scale. Don't worry about getting them exactly, just get them close enough to the image for the program to associate the observed stars with the catalog stars when manually picking. | |||
To enter star picking mode, press ctrl+R. This should bring up an annulus around your reticle, whose size you can control by holding ctrl and scrolling with the mouse wheel. To pick a star, click on the star and the program should automatically snap the point to the centroid. If you are unhappy with its choice, you can force the centroid position by holding ctrl and clicking. The position will appear as an orange cross. Your pick of star will automatically associate with the nearest catalog star (which will be filled with a blue X). If you wish to choose a different catalog star, simply click this again and notice as the blue X switches. To accept a pair, press Enter or Space. | |||
Once you have a centroided a number of stars (minimum 5 to adjust pointing, 12 to adjust distortion), you can fit the plate by clicking "Fit Parameters">"Fit" on the sidebar or ctrl+Z. The green numbers that appear are the star magnitudes and the white numbers are the magnitude errors. The bars represent the fitting errors (magnitude and direction). This will print a residual table to the console, as well as the average error and FOV. | |||
Under the "Fit Parameters" tab, there are several options to adjust to improve your astrometry. The refraction correction should be checked for all camera. If the camera is older and does not have square pixels, uncheck equal aspect. If you suspect that the lens is not completely flat with the sensor (nearly always), check the asymmetry correction. The older distortion models are the poly3+radial models. It is preferable to use the radial-odd models as they do not require stars in all parts of the field to accurately model the distortion. To see which you should use, begin with the lowest order model and check the astrometry residuals by clicking "Fit Parameters">"Astrometry" or by pressing the L key. If there is structure to the residuals, then increase the order until the structure disappears. | |||
Fixed vignetting should only be enabled for cameras with well-measured vignetting. This is preferable to the modeled vignetting parameter, but unless it has been measured in the lab or under controlled conditions it will worsen the photometry fit. Extinction values also typically vary between 0.6 and 1.0 and should be measured on a per-camera basis. Both of these effects increase with distance from the center of the lens, as can be seen by clicking "Fit Parameters">"Photometry" or by pressing the P key. Adjust the extinction until it follows the downward curved line. | |||
After creating a plate, it can be useful to remove high residual error stars. You can filter stars by adjusting "Settings">"Filter Mag Err". Manual add and remove stars until you obtain a fit you are satisfied with. You can check the RMSD to get an idea of how good the fit is. | |||
Latest revision as of 09:39, 10 March 2023
SkyFit2 is a tool used to make astrometric plates and photometric calibrations. An astrometric plate is used to convert measurements on the image to coordinates in the sky (e.g. right ascension and declination). Photometric calibration converts the image pixel intensity to magnitude.
We aim to make SkyFit as user-friendly and universal as possible. It aims to support all optical meteor data formats in existence (videos and still images), as well as calibrating dashcams.
A full video tutorial is available on YouTube.
Example data
Here is some data if you don't have any of your own yet: data link This is data from one fireball observed over the Caucasus Mountains in 2019. You should have everything here for a trajectory solution, and one is already provided in the software. Note that the .config files might be hidden - files beginning with a dot are hidden by default in Linux.
SkyFit2 Anatomy
This section describes the various physical features of the SkyFit2 GUI.
SkyFit Mode
Image Display & Levels
Fit Parameters Tab
Settings Tab
ManualReduction Mode
Image Display & Levels
Settings Tab
Create or Upgrade a Plate with SkyFit2
This page seeks to walkthrough how to create a new plate or upgrade an old plate using RMS SkyFit2 GUI.
Getting Started
To run SkyFit2, first install the RMS git repository and environment. Then run the command
python -m Utils.SkyFit2 INPUT_PATH [-c/--config CONFIG_PATH][-t/--timebeg TIME][-f/--fps FPS][-g/--gamma GAMMA]
This opens the Sky``Fit2 GUI with whatever data is in the directory specified by "INPUT_PATH". Alternatively, can also be a path to a video file or a state file. Make sure to customize the config file to the proper specifications before running this program. The most common options are detailed below:
- Config: Path to the directory containing the appropriate .config file. Default to the DETECTION_PATH.
- Timebeg: Beginning time of the detection in YYYYMMDD_hhmmss.uuuuuu format.
- Fps: Frames per second when images are used. This option overrides the framerate given in from the config file.
- Gamma: Camera gamma value (typically 0.45 or 1.0). This option overrides the framerate read in from the config file
Upon opening, a request for a plate (platepar .cal file) will occur. If you wish to update a plate, select this here. If you wish to make a new plate, simply close this window.
Using RMS data
Collect the desired data in a directory (e.g. /PATH/TO/DATA/DIRECTORY). The directory should contain an FF and an FR file if you're reducing a fireball. Make sure to also copy the required .config file and the platepar_cmn2010.cal if present.
Then run:
python -m Utils.SkyFit2 /PATH/TO/DATA/DIRECTORY --config . --fr
This will load the given data files.
Using FRIPON data
FRIPON data are usually given as a bunch of individual frames in a FITS format. It is very important that all files have a .fit extension (not .fits). SkyFit2 will automatically read the header and download the station coordinates, so you don't have to specify a config file. If the data are in /PATH/TO/DATA/DIRECTORY, simply run:
python -m Utils.SkyFit2 /PATH/TO/DATA/DIRECTORY
Using GFO/DFN data
DFN data are given as .NEF files in the raw Nikon format. To load a GFO image in SkyFit, you will need a dfnstation.cfg file which is usually present on the system. Copy both a .NEF image and the dfnstation.cfg in a standalone directory called e.g. /PATH/TO/DATA/DIRECTORY.
Then run:
python -m Utils.SkyFit2 /PATH/TO/DATA/DIRECTORY --config .
SkyFit will ask you to choose the .NEF file.
Properly calibrating and reducing GFO data can be a bit tricky. The recommended procedure is the following:
- Take a calibration image (the one with the nominally longer exposure) and put it in a separate "calib" directory. Make sure that lots of stars are visible and that there are at least a few very close to the horizon.
- Fit a radial plate (starting with radial3-odd, then fit a radial5-odd, finishing with a radial7-odd), with the asymmetry correction and equal aspect turned on. Set the extinction scale to 0.6 and turn off a fixed vignetting coefficient option. When happy with the fit, hit CTRL + S to save and close SkyFit.
- Prepare the fireball data in another directory and copy the platepar file from the calib directory. The data images have a shorter exposure, so fewer stars are visible. In the previous step, you fit the pointing and the distortion coefficients - because the lens is the same the distortion coefficients remain the same, but the pointing can drift over time. You need to re-calibrate on 10-20 stars but select the "Only fit pointing option".
- Switch to the ManualReduction mode and start picking. Because the timing is encoded using a de Brujin sequence, the fireball consists of dots and gaps (1s and 0s). Start with an obvious dot, clicking it with your mouse. A red cross will appear. Advance to the next point ("frame") by pressing a right arrow key on your keyboard (note that the frame counter will increase). If the next point is a gap, select it with ALT + CLICK (or NUM0 + CLICK) - this will show up as a yellow cross. Keep going until you select all, and you can go back with a left arrow key in case you missed any. It is very important that the order of selected points is correct. Once you've selected about 10-20 points, switch to the Debrujin tab and click "Check sequence". This will try to find a unique solution for the time, but you might be offered with several options. You can choose one if you know the time, or close it and pick a few more points and try again.
- If you want to do photometry, the background needs to be subtracted before pixel colouring is possible. Use a .NEF image that was taken just before or after the fireball as a dark frame by hitting CTRL + D and selecting the file.
Using arbitrary video or image data
This section applies if: a) You are using a video from e.g. a security camera in either a .avi, .mp4, or in a .mov format. b) Or you are using a sequence of images (make sure their names are sorted alphabetically, e.g. frame001.png, frame002.png, etc.). Using just one image works too, then SkyFit2 will run in a special "single-image mode".
You will need to make a custom configuration file and know the absolute time of the first frame.
First, copy the .config file from the RMS source directory to the directory with the video and rename it with the name of the station (we'll use "London" as the station name), e.g. london.config. Then open this file and change the following entries:
stationID: London
latitude:  51.500761 ; WGS84 +N  (degrees) - Use at least 5 decimal places and measure in Google Earth as accurately as possible
longitude:  -0.124585 ; WGS84 +E (degrees)
elevation: 20 ; mean sea level EGM96 geoidal datum, not WGS84 ellipsoidal (meters)

...

width: 1280 ; Set the video resolution
height: 720
fps: 25.0 ; frames per second

...

; Approx. horizontal Field-of-view in degrees
fov_w: 87
; Approx. vertical Field-of-view in degrees
fov_h: 45

; Deinterlacing -2 = global shutter, -1 = rolling shutter, 0 = even first, 1 = odd first
deinterlace_order: -1

...

star_catalog_file: BSC5 ; This sets a star catalog with bright stars

...

catalog_mag_limit: 4.0 ; Security cameras usually can't see stars fainter than this, but you can always adjust this later
Then given the absolute UTC time of the first frame in the YYYYMMDD_hhmmss.uuuuuu format (e.g. 20230214_021629.0) and the path to the video file (e.g. /PATH/TO/DATA/DIRECTORY/video.mp4), run:
python -m Utils.SkyFit2 /PATH/TO/DATA/DIRECTORY/video.mp4 --config . --timebeg 20230214_021629.0
If you are using a sequence of images, then give it the path to the directory which contains the images:
python -m Utils.SkyFit2 /PATH/TO/DATA/DIRECTORY/ --config . --timebeg 20230214_021629.0
If you are using just one image, use the command above and SkyFit will ask which image to open (you should have only one in the directory, together with the config file).
Creating a Plate
- NOTE: When entering hotkey commands in SkyFit2, you must be in the main frame/viewer.
Adjust the levels on the right as required or automatically set them by pressing ctrl+A. Once you are happy, begin to rotate the catalog stars into an approximately correct position using your keyboard. A/D control the azimuth, S/W control the altitude, Q/E control the position angle, and Up/Down controls the scale. Don't worry about getting them exactly, just get them close enough to the image for the program to associate the observed stars with the catalog stars when manually picking.
To enter star picking mode, press ctrl+R. This should bring up an annulus around your reticle, whose size you can control by holding ctrl and scrolling with the mouse wheel. To pick a star, click on the star and the program should automatically snap the point to the centroid. If you are unhappy with its choice, you can force the centroid position by holding ctrl and clicking. The position will appear as an orange cross. Your pick of star will automatically associate with the nearest catalog star (which will be filled with a blue X). If you wish to choose a different catalog star, simply click this again and notice as the blue X switches. To accept a pair, press Enter or Space.
Once you have a centroided a number of stars (minimum 5 to adjust pointing, 12 to adjust distortion), you can fit the plate by clicking "Fit Parameters">"Fit" on the sidebar or ctrl+Z. The green numbers that appear are the star magnitudes and the white numbers are the magnitude errors. The bars represent the fitting errors (magnitude and direction). This will print a residual table to the console, as well as the average error and FOV.
Under the "Fit Parameters" tab, there are several options to adjust to improve your astrometry. The refraction correction should be checked for all camera. If the camera is older and does not have square pixels, uncheck equal aspect. If you suspect that the lens is not completely flat with the sensor (nearly always), check the asymmetry correction. The older distortion models are the poly3+radial models. It is preferable to use the radial-odd models as they do not require stars in all parts of the field to accurately model the distortion. To see which you should use, begin with the lowest order model and check the astrometry residuals by clicking "Fit Parameters">"Astrometry" or by pressing the L key. If there is structure to the residuals, then increase the order until the structure disappears.
Fixed vignetting should only be enabled for cameras with well-measured vignetting. This is preferable to the modeled vignetting parameter, but unless it has been measured in the lab or under controlled conditions it will worsen the photometry fit. Extinction values also typically vary between 0.6 and 1.0 and should be measured on a per-camera basis. Both of these effects increase with distance from the center of the lens, as can be seen by clicking "Fit Parameters">"Photometry" or by pressing the P key. Adjust the extinction until it follows the downward curved line.
After creating a plate, it can be useful to remove high residual error stars. You can filter stars by adjusting "Settings">"Filter Mag Err". Manual add and remove stars until you obtain a fit you are satisfied with. You can check the RMSD to get an idea of how good the fit is.
